21 Spooky Halloween Dog Treats to Bake This October
Halloween is creeping up, and while we’re all about the costumes and candy, our furry best friends often get left out of the treat-or-treating fun. Store-bought candy is a big no-no for dogs, but that doesn’t mean they can’t have their own special spooky snacks! This year, why not brew up some magic in your own kitchen? Baking homemade treats is a fantastic way to show your pup some love, control the ingredients, and have a howling good time together.
We’ve conjured up 21 of the most spooktacular, delicious, and dog-safe Halloween treat recipes that are easy to make. Whether you’re a baking novice or a kitchen wizard, you’ll find something here to get your dog’s tail wagging. Let’s get this paw-ty started!
Quick Recipe Guide
| Recipe | Difficulty | Key Flavors | Best For |
|---|---|---|---|
| Peanut Butter Pumpkin Pups | Easy | Pumpkin, Peanut Butter | Classic Flavor Fans |
| Sweet Potato Witch Fingers | Easy | Sweet Potato | Single-Ingredient Simplicity |
| Frozen Banana Ghosts | Super Easy | Banana, Yogurt | No-Bake Treat Lovers |
| Carrot & Ginger Jack-o’-Lanterns | Medium | Carrot, Ginger | Dogs Needing a Digestive Aid |
1. Peanut Butter Pumpkin Pups
This recipe is a timeless classic, combining two flavors most dogs go absolutely wild for: pumpkin and peanut butter. These simple, cookie-cutter treats are perfect for getting into the Halloween spirit. The pumpkin puree is great for digestion, and the peanut butter provides a protein-packed punch.
Ingredients:
- 2 1/2 cups whole wheat flour
- 1/2 cup pumpkin puree (100% pure, no added sugar)
- 1/4 cup xylitol-free peanut butter
- 2 large eggs
- 1/2 teaspoon cinnamon
Instructions:
Preheat your oven to 350°F (175°C). In a large bowl, mix the pumpkin puree, peanut butter, and eggs until well combined. Gradually stir in the flour and cinnamon until a stiff dough forms. On a lightly floured surface, roll the dough to about 1/4-inch thickness. Use Halloween-themed cookie cutters (like pumpkins or ghosts) to cut out shapes. Place on a baking sheet lined with parchment paper and bake for 20-25 minutes, or until golden brown. Let them cool completely before serving.
Pros & Cons
Pros:
|
Cons:
|
Verdict:
A perfect starting recipe for any pet parent looking to bake for their pup this Halloween. It’s a crowd-pleaser that’s both healthy and delicious.
2. Sweet Potato Witch Fingers

These spooky-looking treats are deceptively simple and healthy! Made from just one ingredient, they are a fantastic option for dogs with sensitive stomachs or allergies. They look just like gnarled witch fingers, making them a perfectly creepy and chewy snack.
Ingredients:
- 2 large sweet potatoes
- Optional: A slivered almond for the ‘fingernail’
Instructions:
Preheat your oven to 250°F (120°C). Wash and peel the sweet potatoes. Cut them lengthwise into 1/4 to 1/2-inch thick strips, resembling fingers. For an extra spooky touch, you can use a knife to carve ‘knuckle’ lines into each strip. If using, press a slivered almond into one end of each ‘finger’ to look like a fingernail. Place the strips on a baking sheet lined with parchment paper and bake for 2.5 to 3 hours, flipping halfway through. They should be dry and chewy, not mushy. Cool completely.
Pros & Cons
Pros:
|
Cons:
|
Verdict:
Ideal for the health-conscious pet owner or dogs with food sensitivities. These chews are simple, nutritious, and perfectly on-theme.
3. Carob Spiderweb Cookies

Want to give your dog a ‘chocolatey’ treat without the danger? Carob is your answer! It’s a dog-safe substitute for chocolate that allows you to create these adorable spiderweb cookies. This recipe is a little more involved but the final result is well worth the effort.
Ingredients:
- 2 cups oat flour
- 1/2 cup unsweetened applesauce
- 1 egg
- For the ‘icing’: 2 tablespoons carob powder mixed with 2-3 teaspoons of water
Instructions:
Preheat oven to 350°F (175°C). Combine the oat flour, applesauce, and egg in a bowl to form a dough. Roll it out to 1/4-inch thickness and use a round cookie cutter to make circles. Place on a baking sheet and bake for 15-20 minutes. Let the cookies cool completely. While they cool, mix the carob powder and water to create a smooth, drizzly icing. Use a small piping bag or a spoon to drizzle the carob icing in a spiral on each cookie, then drag a toothpick from the center outwards to create a web effect.
Pros & Cons
Pros:
|
Cons:
|
Verdict:
For the baker who wants to create something visually stunning. These cookies are a guaranteed hit at any doggy Halloween party.
4. Apple & Cheddar Monster Mouths
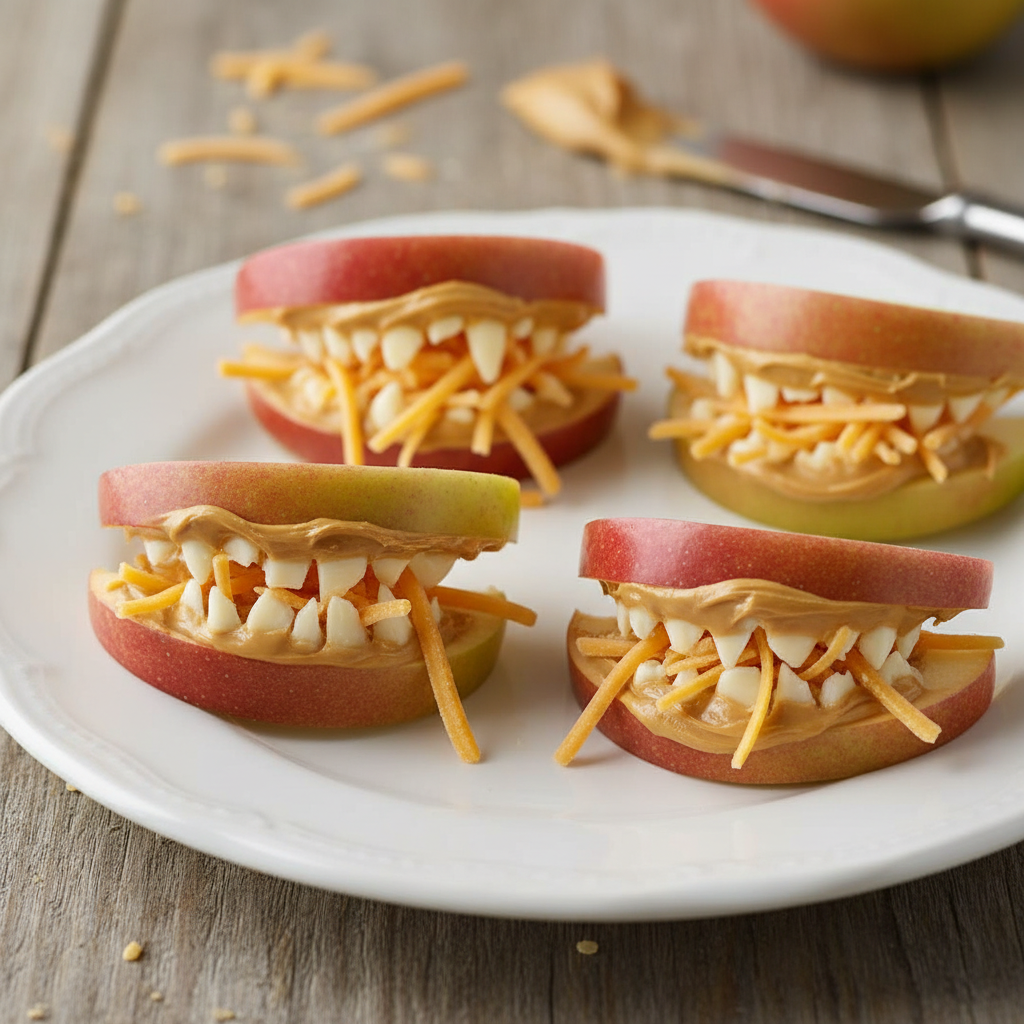
This is a super fun, no-bake recipe that’s more about assembly than cooking. These monster mouths are crunchy, a little cheesy, and full of healthy ingredients. They are incredibly easy to put together for a last-minute spooky snack.
Ingredients:
- 1 large apple (any variety)
- Shredded cheddar cheese
- Xylitol-free peanut butter
Instructions:
Core the apple and cut it into thick slices. Take two apple slices to form the ‘lips’ of the mouth. Spread a thin layer of peanut butter on one side of each slice. Sprinkle a small amount of shredded cheddar cheese onto the peanut butter on one of the slices to act as the ‘teeth’. Gently press the second apple slice on top to complete your monster mouth. Serve immediately.
Pros & Cons
Pros:
|
Cons:
|
Verdict:
Perfect for a quick, fun, and healthy Halloween snack when you’re short on time. Kids will love helping to make these for the family dog.
5. Frozen Banana Ghosts
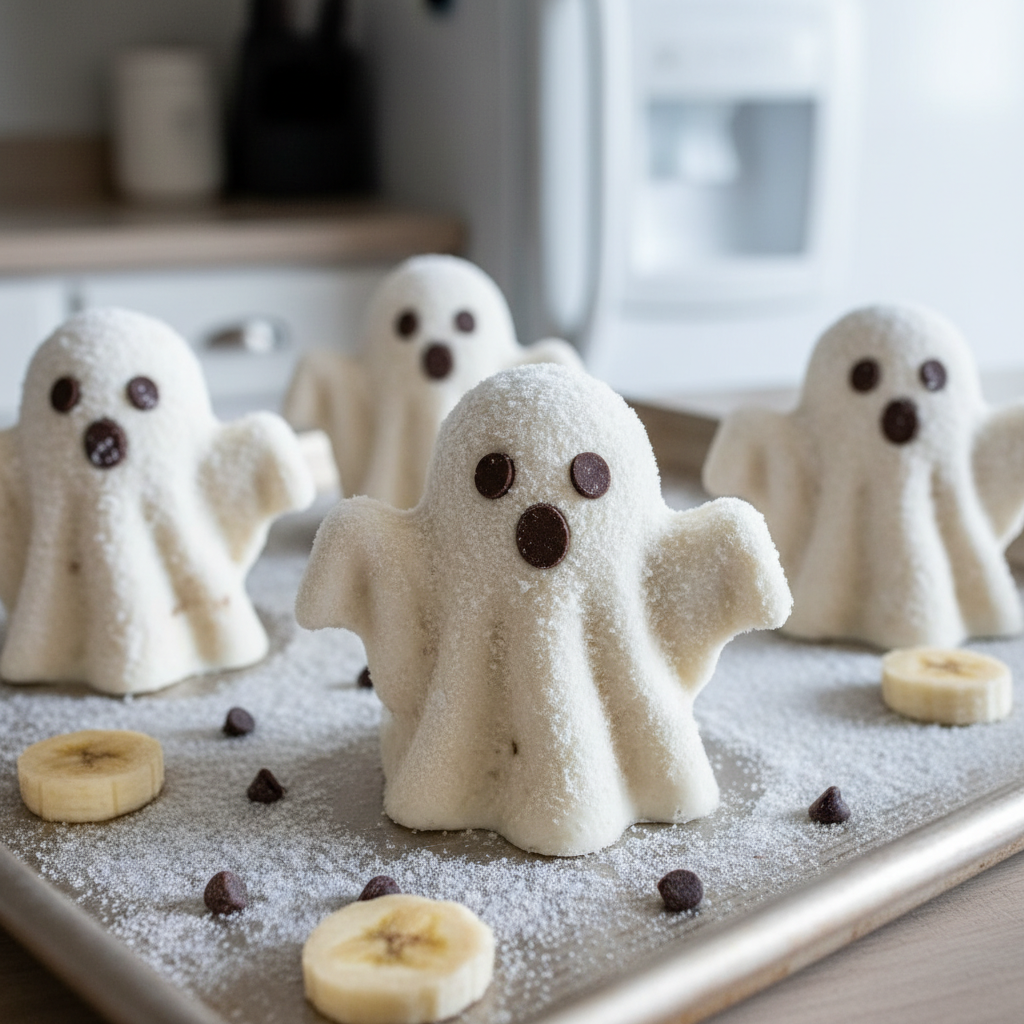
Another incredibly simple no-bake treat! These frozen ghosts are cool, creamy, and perfect for dogs who love fruit. They require minimal effort and are a great way to use up ripe bananas.
Ingredients:
- 2 ripe bananas
- 1/2 cup plain, unsweetened yogurt
- Mini carob chips (dog-safe) for eyes
Instructions:
Peel the bananas and cut them in half crosswise. Cut each half lengthwise to create two flat-sided pieces. Insert a popsicle stick or a sturdy dog chew into the bottom of each piece. Dip each banana piece in the yogurt, ensuring it’s fully coated. Place two mini carob chips on each one for eyes. Lay them on a wax paper-lined baking sheet and freeze for at least 4 hours, or until solid.
Pros & Cons
Pros:
|
Cons:
|
Verdict:
A fantastic, easy, and refreshing treat, especially if you live in a warmer climate. Great for dogs who enjoy frozen snacks.
6. Blueberry Bat Bites
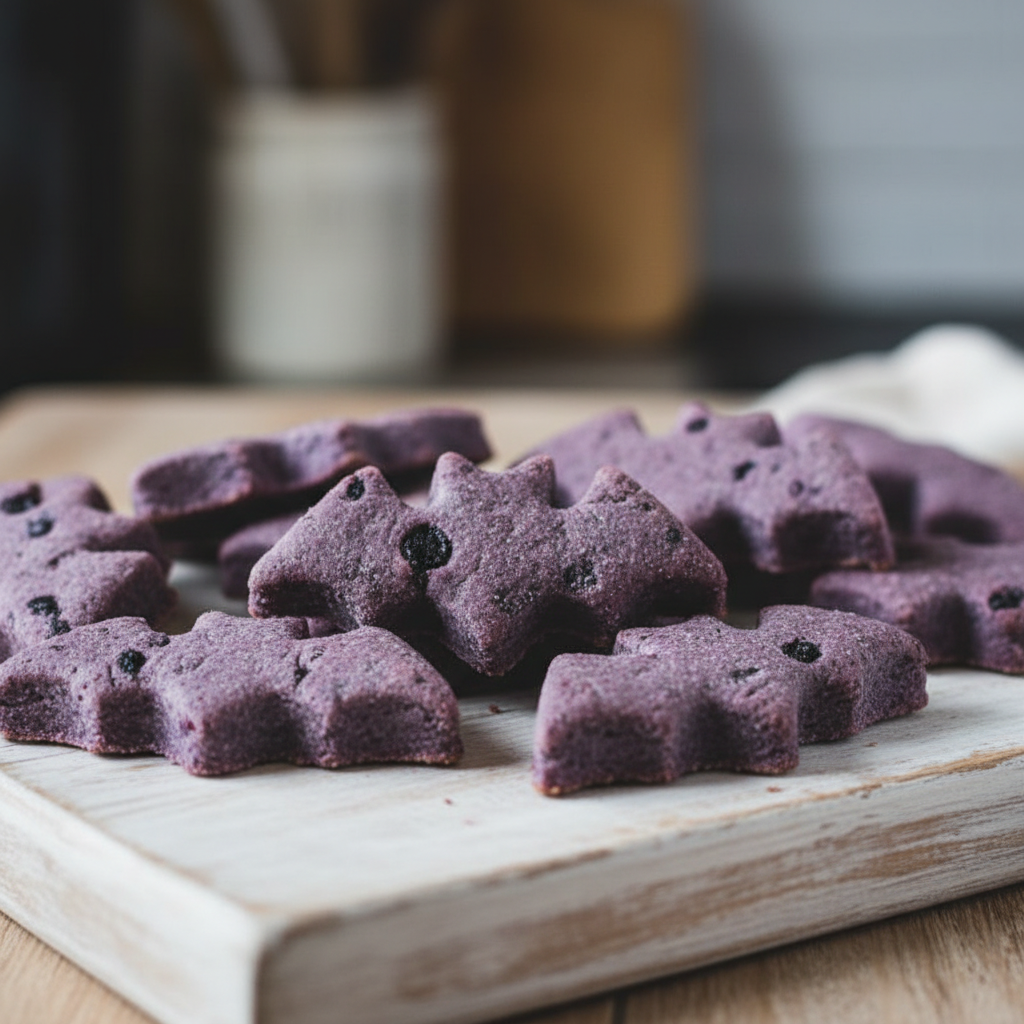
These spooky little bites are packed with antioxidants from the blueberries and get their dark, bat-like color naturally. They are a grain-free option that’s both healthy and festive.
Ingredients:
- 1 cup coconut flour
- 1/2 cup pureed blueberries (fresh or frozen)
- 2 eggs
- 2 tablespoons coconut oil, melted
Instructions:
Preheat your oven to 350°F (175°C). In a bowl, mix the coconut flour, pureed blueberries, eggs, and melted coconut oil. The dough will be thick and a bit crumbly. Press the dough onto a parchment-lined baking sheet until it’s about 1/4-inch thick. Use a bat-shaped cookie cutter to cut out the treats. You may need to press the dough firmly into the cutter. Bake for 15-18 minutes. Let them cool fully before serving.
Pros & Cons
Pros:
|
Cons:
|
Verdict:
A great choice for pet owners looking for a grain-free, antioxidant-rich treat that fits the spooky theme perfectly.
7. Carrot & Ginger Jack-o’-Lanterns

Carve out some fun with these adorable Jack-o’-Lantern treats! Carrots provide a natural sweetness and vibrant orange color, while a hint of ginger can aid in your dog’s digestion. They’re a healthy and festive baked goodie.
Ingredients:
- 1 cup grated carrot
- 1 1/2 cups whole wheat flour
- 1 egg
- 1/4 cup water
- 1 teaspoon ground ginger
Instructions:
Preheat oven to 350°F (175°C). In a large bowl, combine the grated carrot, flour, egg, water, and ginger. Mix until a firm dough forms. Roll the dough out on a floured surface to 1/4-inch thickness. Use a small, round cookie cutter to make circles. You can use a knife or a skewer to gently carve little Jack-o’-Lantern faces into each cookie before baking. Place on a baking sheet and bake for 20 minutes. Cool completely.
Pros & Cons
Pros:
|
Cons:
|
Verdict:
Perfect for the creative pet parent who enjoys a bit of detail work. A healthy, festive treat with added digestive benefits.
8. Oatmeal & Molasses Tombstones
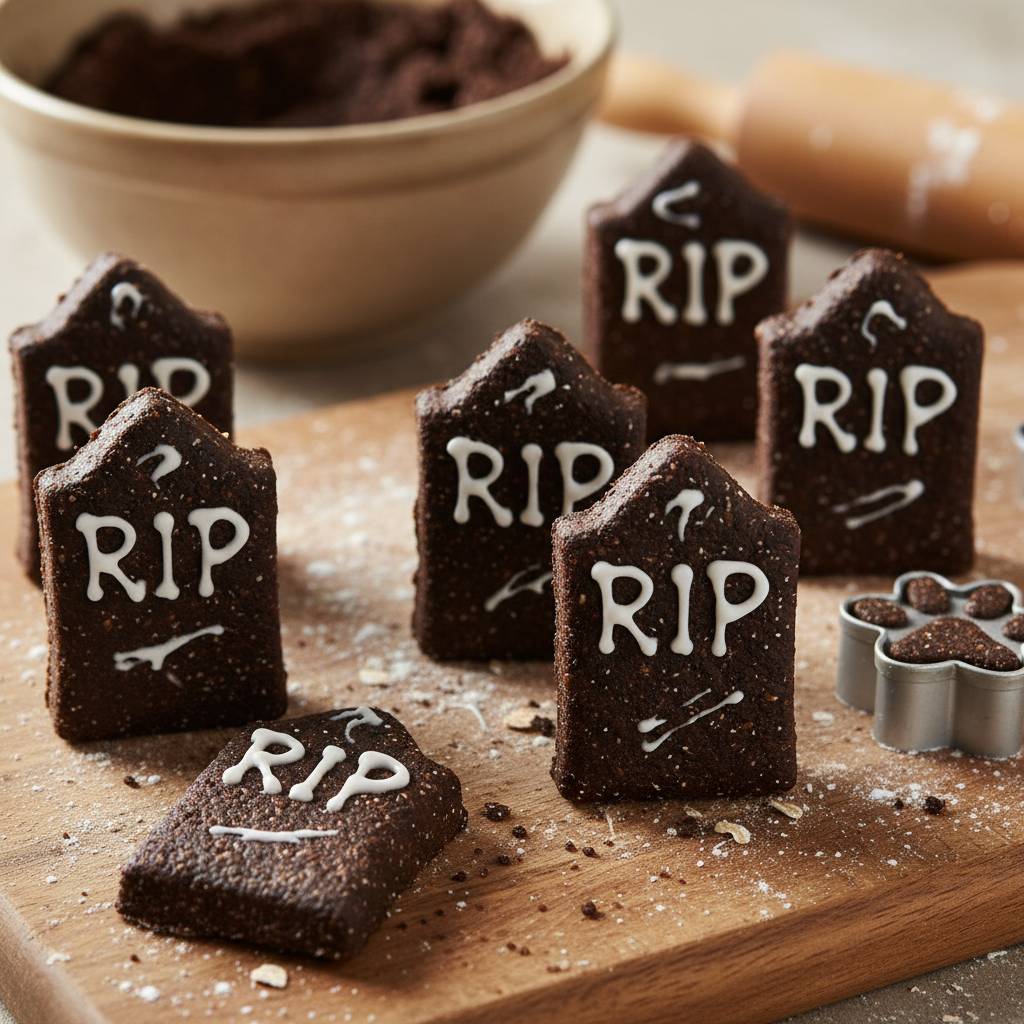
Create a ghoulish graveyard scene with these hearty oatmeal tombstones. Molasses gives them a rich, slightly sweet flavor and a dark color perfect for the theme, while oats provide plenty of fiber.
Ingredients:
- 2 cups rolled oats (ground into a flour)
- 1/2 cup water
- 1/4 cup blackstrap molasses
- 1 egg
- Yogurt or cream cheese for writing ‘RIP’
Instructions:
Preheat oven to 325°F (165°C). If you don’t have oat flour, simply blend rolled oats in a blender until fine. In a bowl, mix the oat flour, water, molasses, and egg until a dough forms. Roll out to 1/4-inch thickness and use a knife or a tombstone-shaped cookie cutter to create the shapes. Bake on a parchment-lined sheet for 20-25 minutes. Once completely cool, you can use a small amount of plain yogurt or cream cheese in a piping bag to write ‘RIP’ on each tombstone.
Pros & Cons
Pros:
|
Cons:
|
Verdict:
A fun, creative, and fiber-rich treat for owners who want to set up a whole spooky scene for their pup.
9. Liver Slime Gummy Worms
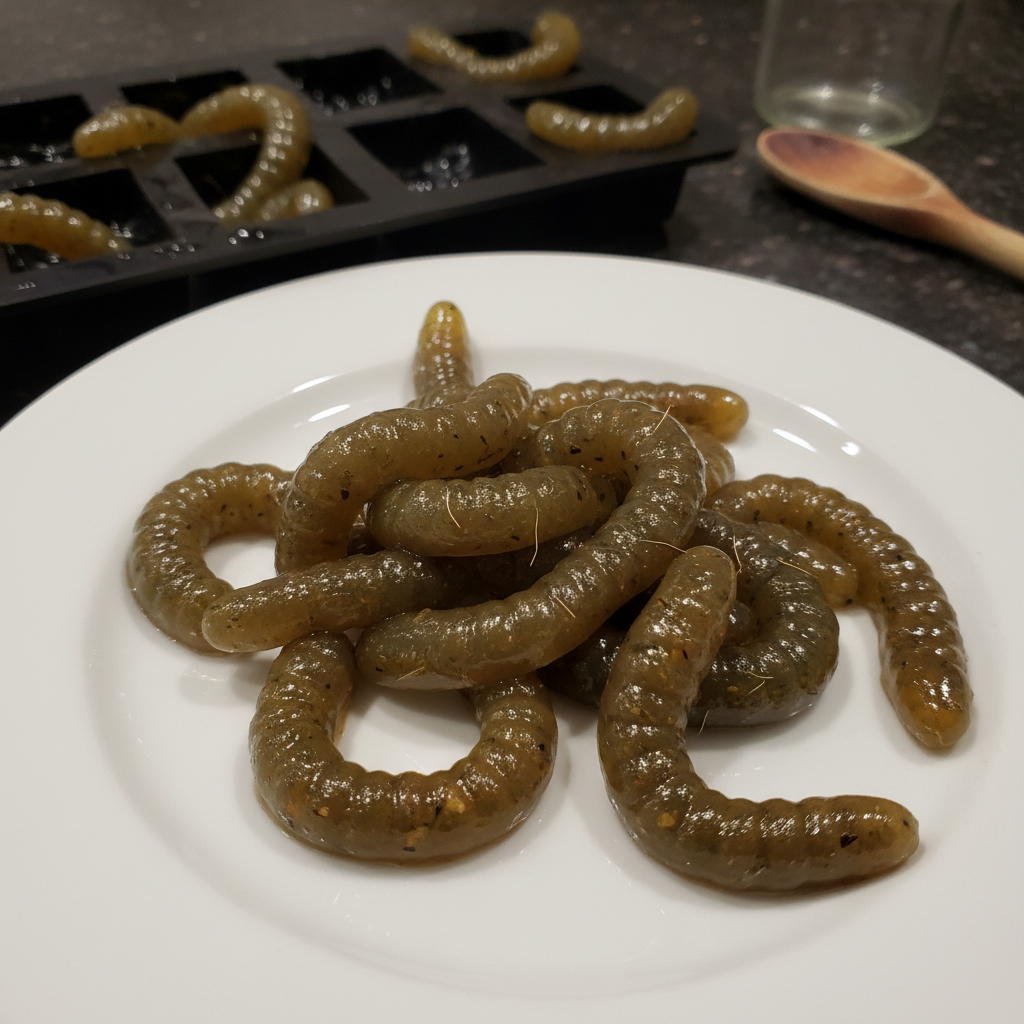
Time for something truly grotesque and grizzly that your dog will find irresistible! These gummy worms are made with beef liver and gelatin, creating a jiggly, protein-packed treat that looks like slimy worms. The addition of spinach or parsley gives them a ghoulish green tint.
Ingredients:
- 1/4 cup cooked beef liver, finely minced
- 1 cup warm water or unsalted beef broth
- 2 tablespoons unflavored gelatin
- Handful of fresh spinach or parsley (for color)
Instructions:
In a blender, combine the warm water/broth, cooked liver, and spinach. Blend until completely smooth. Pour the mixture into a small saucepan and sprinkle the gelatin over the top. Let it sit for 5 minutes to ‘bloom’. Then, heat the mixture over low heat, stirring constantly until the gelatin is fully dissolved. Do not let it boil. Use a dropper or a small funnel to pour the mixture into worm-shaped silicone molds. Refrigerate for at least 3-4 hours, or until firm. Pop them out and watch your dog go crazy!
Pros & Cons
Pros:
|
Cons:
|
Verdict:
For the adventurous owner who isn’t squeamish! This is a nutrient-dense, high-value treat that perfectly captures the gross-out fun of Halloween.
10. Coconut & Spirulina Frankenstein Paws

It’s alive! These Frankenstein-themed treats get their monstrous green hue from spirulina, a superfood algae that’s packed with nutrients. Combined with the healthy fats of coconut, these paws are a healthy and horrifyingly good snack.
Ingredients:
- 1 1/2 cups coconut flour
- 1/2 cup unsweetened applesauce
- 2 eggs
- 1 teaspoon spirulina powder
Instructions:
Preheat your oven to 350°F (175°C). In a large bowl, whisk together the applesauce, eggs, and spirulina powder until the color is uniform. Gradually mix in the coconut flour until a dough forms. Coconut flour is very absorbent, so the dough will be dense. Roll it out between two sheets of parchment paper to 1/4-inch thickness. Use a paw-print cookie cutter to make shapes. Bake for 12-15 minutes. They won’t spread much, so you can place them close together. Cool completely.
Pros & Cons
Pros:
|
Cons:
|
Verdict:
An excellent choice for health-focused dog owners who want to incorporate superfoods into their pup’s diet in a fun, festive way.
11. Salmon Skin Mummies

Don’t throw away those salmon skins! You can turn them into creepy, crunchy mummy chews for your dog. The natural oils in salmon skin are fantastic for a dog’s coat and skin. This is less of a recipe and more of a simple dehydration process.
Ingredients:
- Skin from a fillet of salmon (ensure it’s from wild-caught, not farmed, and has no seasonings)
- Optional: Strips of plain yogurt for ‘bandages’
Instructions:
Preheat your oven to its lowest setting, around 200°F (95°C). Scrape off any excess flesh from the salmon skin. Cut the skin into long, 1-inch wide strips. Lay the strips on a baking rack placed on top of a baking sheet (to catch drips). Bake for 1.5-2 hours, or until the skins are dry and crispy. For the mummy effect, you can drizzle thin lines of plain yogurt across the cooled strips to look like bandages. Serve immediately if using yogurt.
Pros & Cons
Pros:
|
Cons:
|
Verdict:
A fantastic, eco-friendly treat for dogs who love fish. The Omega-3 boost is a wonderful health benefit disguised as a spooky snack.
12. Cheesy Broomsticks

Fly into flavor with these adorable and savory cheesy broomsticks. They are a simple assembly-only treat that combines the crunch of a dog-safe pretzel stick with the deliciousness of cheese. They’re a guaranteed hit for any cheese-loving canine.
Ingredients:
- Dog-safe pretzel sticks or other stick-shaped dog biscuits
- String cheese
Instructions:
Take one stick of string cheese. Cut it in half. For each half, make several cuts into one end, going about halfway up the cheese, to create the ‘bristles’ of the broom. Gently fan out the cut ends. Carefully insert a pretzel stick or dog biscuit into the uncut end of the cheese. That’s it! You have a witch’s broomstick ready for your pup to enjoy.
Pros & Cons
Pros:
|
Cons:
|
Verdict:
The ultimate quick and clever treat for a Halloween-themed puppy playdate or when you need a festive snack in a flash.
13. Yogurt & Berry Bloody Bones

These treats look gruesome but are delightfully fruity and refreshing. Using a simple mixture of yogurt and berries, you can create frozen ‘bloody’ bones that are both tasty and packed with probiotics and antioxidants.
Ingredients:
- 1 cup plain, unsweetened yogurt
- 1/2 cup mixed berries (like raspberries and strawberries), pureed
- Bone-shaped silicone mold
Instructions:
In a small bowl, mix the yogurt and pureed berries. You can mix them completely for a pink color, or swirl them gently for a more ‘bloody’ marbled effect. Spoon the mixture into the bone-shaped silicone molds. Tap the mold on the counter to remove any air bubbles. Freeze for at least 4 hours, or until completely solid. Pop out the frozen bones and serve on a dark plate for a spooky contrast.
Pros & Cons
Pros:
|
Cons:
|
Verdict:
A simple, healthy, and visually striking frozen treat. Perfect for dogs of all ages, from teething puppies to seniors.
14. Pumpkin Spice Pup-uccinos

Let your dog join in on the fall-favorite drink craze with a safe and delicious Pumpkin Spice Pup-uccino. This is a warm, comforting liquid treat that’s perfect for a chilly October evening.
Ingredients:
- 1/2 cup pure pumpkin puree
- 1/2 cup plain, unsweetened kefir or goat’s milk
- A sprinkle of cinnamon
- Optional: A dollop of whipped cream (unsweetened)
Instructions:
Gently warm the kefir or goat’s milk in a small saucepan over low heat (do not boil). In a small bowl or cup, whisk together the warm milk, pumpkin puree, and cinnamon until smooth and frothy. Pour into your dog’s favorite bowl. If you’re feeling fancy, top with a tiny bit of plain whipped cream. Serve warm, but not hot.
Pros & Cons
Pros:
|
Cons:
|
Verdict:
For the pampered pooch who deserves to be part of the pumpkin spice phenomenon. It’s a comforting, gut-healthy treat.
15. Apple Cinnamon Spider Cookies

These cookies combine the cozy flavors of apple and cinnamon into a creepy-crawly treat. They are simple to bake and the ‘spider’ decoration is an easy, fun touch.
Ingredients:
- 1 cup whole wheat flour
- 1/2 cup unsweetened applesauce
- 1 egg
- 1/2 teaspoon cinnamon
- Dog-safe carob chips for decoration
Instructions:
Preheat oven to 350°F (175°C). Mix the flour, applesauce, egg, and cinnamon to form a dough. Roll out and cut into circles. Bake for 15-20 minutes and let cool completely. Once cool, place a single carob chip in the center of a cookie to be the spider’s ‘body’. Melt a few extra carob chips and use a toothpick to draw eight little legs coming from the central chip. Let the carob set before serving.
Pros & Cons
Pros:
|
Cons:
|
Verdict:
A great baking project for families. These cookies taste as good as they look and are filled with wholesome ingredients.
16. Beef Broth Gummy Eyeballs
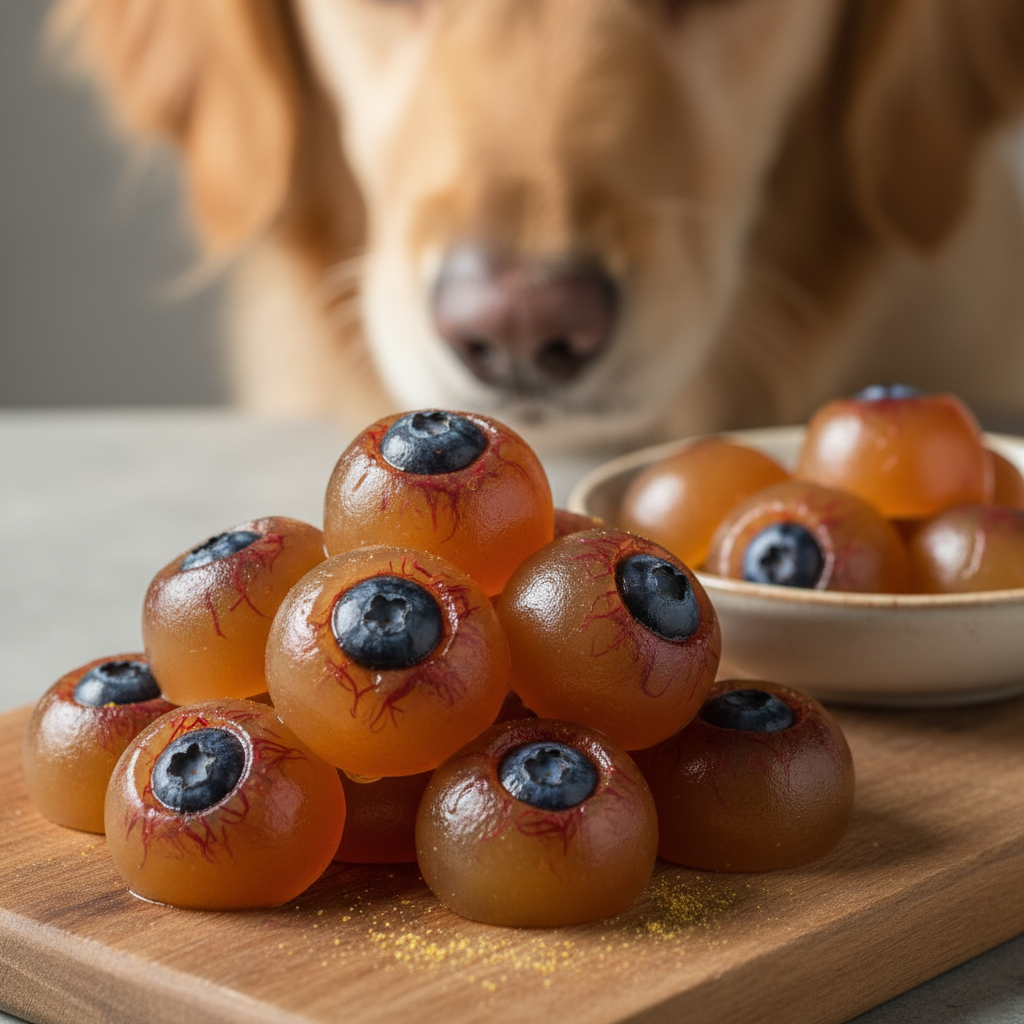
Looking for a savory gummy? These jiggly eyeballs are made with beef broth for a flavor your dog will love. They look fantastically gruesome in a bowl and are great for your dog’s joints, thanks to the gelatin.
Ingredients:
- 1 cup unsalted beef broth
- 2 tablespoons unflavored gelatin
- A few blueberries or small round pieces of carrot for the ‘pupil’
- Sphere-shaped silicone mold
Instructions:
Pour the beef broth into a saucepan and sprinkle the gelatin over the top. Let it bloom for 5 minutes. Heat on low, stirring, until the gelatin dissolves. Place a single blueberry or a tiny piece of carrot in the bottom of each half-sphere mold. Carefully pour the broth mixture over the top. Refrigerate for 3-4 hours until firm. Pop them out and serve your pup some spooky, savory eyeballs!
Pros & Cons
Pros:
|
Cons:
|
Verdict:
Perfect for dogs who aren’t fans of sweet treats. These savory gummies are a healthy, high-protein, and horrifyingly fun snack.
17. Sardine & Seaweed Swamp Monsters

Unleash the monster from the deep! These treats are for the true fish lovers, combining nutrient-rich sardines and nori (seaweed) for a potent, ocean-flavored snack. The seaweed gives them a murky, swampy green color.
Ingredients:
- 1 can of sardines packed in water (no salt added), drained
- 1 egg
- 1 cup oat flour
- 1 sheet of nori (plain, unsalted seaweed), crumbled
Instructions:
Preheat oven to 350°F (175°C). In a bowl, mash the sardines well. Mix in the egg, oat flour, and crumbled nori. The dough will be oily and a bit sticky. Drop small, monster-like spoonfuls onto a parchment-lined baking sheet. Bake for 15-20 minutes, until firm and lightly browned. Let them cool completely—the fishy smell will be strong!
Pros & Cons
Pros:
|
Cons:
|
Verdict:
The ultimate high-value treat for the fish-obsessed dog. The health benefits for their skin and coat are immense, but be prepared for the aroma!
18. Turkey & Cranberry Skulls

A hint of Thanksgiving in your Halloween treats! These savory skulls use ground turkey and cranberries for a festive flavor combination that’s a little unexpected but totally delicious for dogs.
Ingredients:
- 1 lb ground turkey
- 1/4 cup unsweetened dried cranberries, chopped
- 1 egg
- 1/2 cup rolled oats
- Skull-shaped silicone mold or pan
Instructions:
Preheat oven to 375°F (190°C). In a large bowl, combine the ground turkey, chopped cranberries, egg, and rolled oats. Mix with your hands until everything is evenly incorporated. Press the mixture firmly into a skull-shaped mold or pan. If you don’t have one, you can form them by hand. Bake for 20-25 minutes, or until the turkey is cooked through. Let cool and drain any excess fat before serving.
Pros & Cons
Pros:
|
Cons:
|
Verdict:
A meaty, savory, and healthy treat that feels more like a mini-meal. Perfect for celebrating the entire holiday season from October through November.
19. Grain-Free Pumpkin Bats

Another great grain-free option for sensitive pups. This recipe uses almond flour and pumpkin to create a sturdy, delicious biscuit perfect for cutting into spooky bat shapes.
Ingredients:
- 2 cups almond flour
- 1/2 cup pumpkin puree
- 1 egg
- 1 teaspoon cinnamon
Instructions:
Preheat oven to 350°F (175°C). In a bowl, mix all ingredients together until a dough forms. The dough will be less elastic than wheat-based dough. Place the dough between two sheets of parchment paper and roll to 1/4-inch thickness. Use a bat-shaped cookie cutter to cut out the shapes. Carefully transfer them to a baking sheet. Bake for 15-18 minutes, until the edges are golden. Cool completely.
Pros & Cons
Pros:
|
Cons:
|
Verdict:
An excellent choice for dogs on a grain-free diet. These bats are a healthy, simple, and satisfyingly crunchy treat.
20. No-Bake Peanut Butter ‘Spider’ Balls

When you’re completely out of time but still want to make something special, these no-bake balls are the answer. They come together in minutes and can be decorated to look like little spiders.
Ingredients:
- 1 cup rolled oats
- 1/2 cup xylitol-free peanut butter
- 1/4 cup honey or maple syrup
- Carob powder for rolling
- Optional: Melted carob for legs
Instructions:
In a bowl, mix the rolled oats, peanut butter, and honey/maple syrup until well combined. The mixture should be thick and easy to roll. If it’s too sticky, add more oats. Roll the mixture into small, bite-sized balls. Roll each ball in carob powder to coat it, making it look dark and spooky. For the spider effect, you can use a toothpick to draw on legs with melted carob. Refrigerate for 30 minutes to firm up before serving.
Pros & Cons
Pros:
|
Cons:
|
Verdict:
The perfect recipe for busy pet parents or those who don’t enjoy baking. These energy balls are a delicious and convenient Halloween treat.
21. Chicken & Rice ‘Candy Corn’ Treats
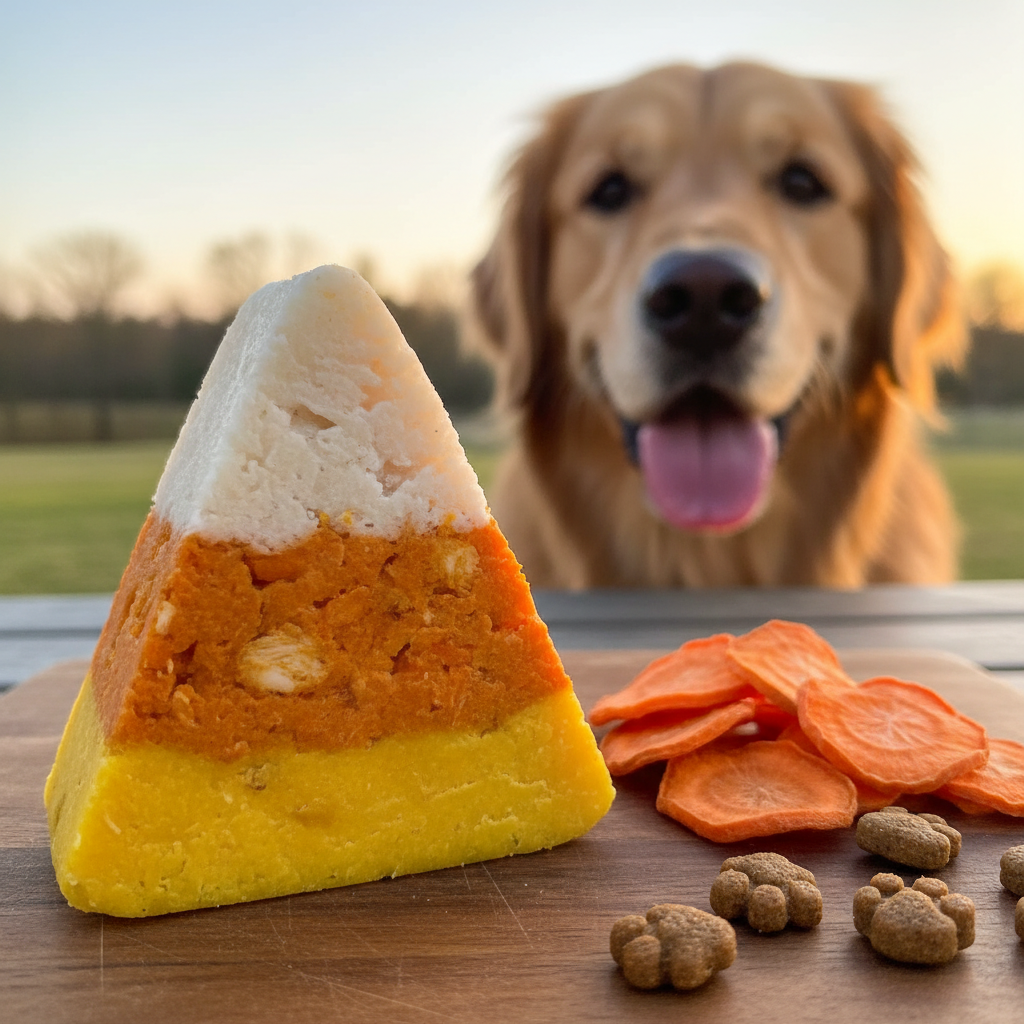
A savory, healthy take on a classic Halloween candy! These layered treats use natural ingredients to mimic the look of candy corn. It’s a bit more work, but the result is a unique and impressive treat your dog will adore.
Ingredients:
- Bottom Layer (Yellow): 1/2 cup cooked, pureed sweet potato
- Middle Layer (Orange): 1/2 cup cooked, shredded chicken mixed with 1/4 cup cooked, pureed carrots
- Top Layer (White): 1/2 cup cooked white rice, slightly mashed
- 2 tablespoons unflavored gelatin dissolved in 1/2 cup warm chicken broth
Instructions:
Line a small loaf pan with plastic wrap. First, prepare the gelatin by dissolving it in the warm broth. Pour a small amount of the gelatin mixture into each of the three layer bowls and mix well. This will help them set. Start with the yellow layer: press the sweet potato mixture firmly and evenly into the bottom of the pan. Next, carefully spread the orange chicken and carrot mixture on top. Finally, add the white rice layer, pressing gently. Cover and refrigerate for at least 6 hours or overnight until completely firm. Once set, lift the block out using the plastic wrap, place on a cutting board, and slice into small, candy-corn-shaped triangles.
Pros & Cons
Pros:
|
Cons:
|
Verdict:
For the dedicated doggy chef who wants to create a show-stopping, savory treat. This is a healthy, impressive, and delicious way to celebrate Halloween.
A Baker’s Guide to Spooky & Safe Dog Treats
Baking for your dog is a blast, but safety should always be your top priority. Unlike us, our dogs can’t handle all the same ingredients. Keeping a few key things in mind will ensure your Halloween treats are all treat, no trick!
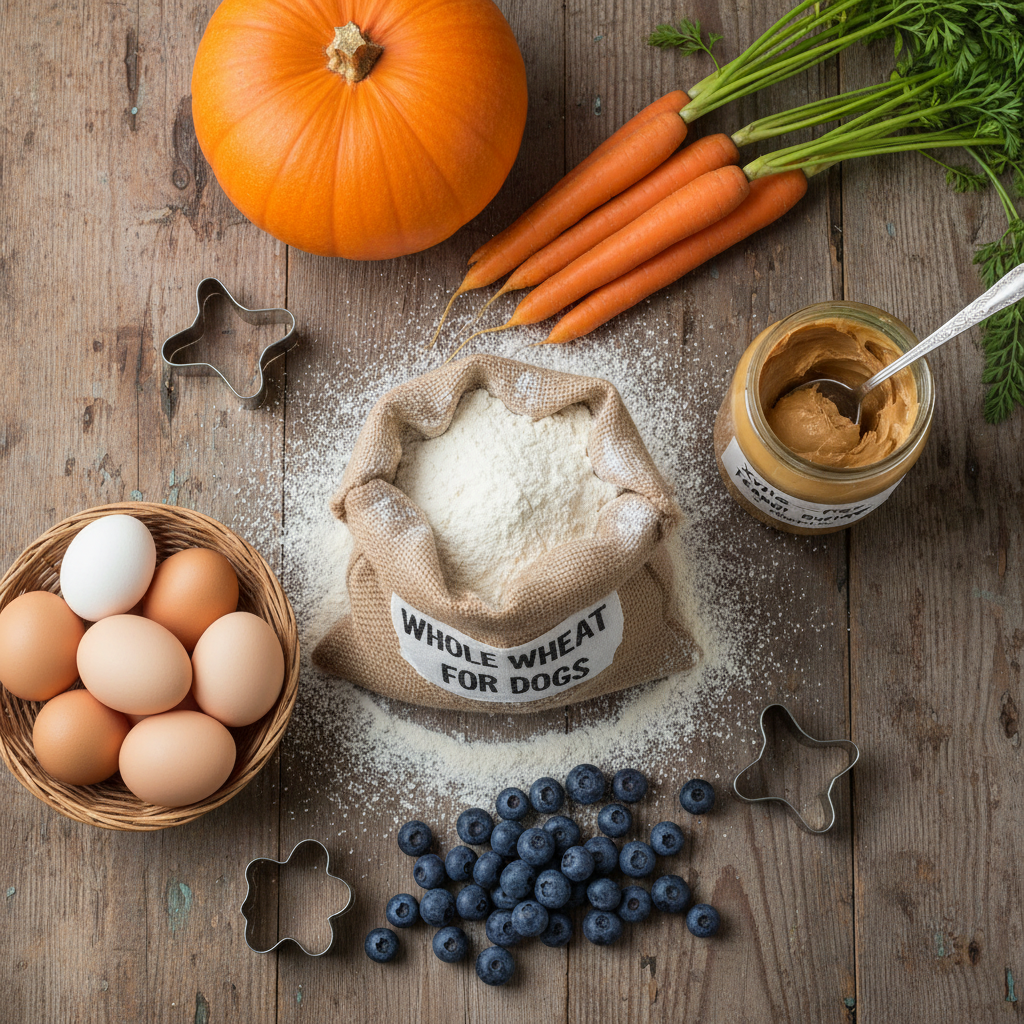
Dog-Safe Ingredients to Embrace
Most of the recipes above use these, but it’s a great list to have on hand for your own creations:
- Flours: Whole wheat, oat, coconut, and almond flour are all great choices.
- Binders: Eggs, pumpkin puree, unsweetened applesauce, and bananas work well.
- Fruits & Veggies: Pumpkin, sweet potatoes, carrots, blueberries, and apples (no seeds!) are fantastic.
- Protein: Plain, cooked meats, xylitol-free peanut butter, and plain yogurt are excellent.
DANGEROUS Ingredients to Avoid
This is critical. Never use the following in your dog’s treats:
- Xylitol: This artificial sweetener is extremely toxic to dogs. It’s often found in peanut butter, so check the label carefully!
- Chocolate & Cocoa Powder: Both are toxic and should never be given to dogs. Use carob as a safe alternative.
- Onions, Garlic, Chives: These can damage a dog’s red blood cells.
- Grapes & Raisins: Highly toxic and can cause kidney failure.
- Macadamia Nuts: Another toxic ingredient to avoid.
Tips for Natural Food Coloring
Want to make your treats even more festive without artificial dyes? Use nature’s palette!
- Green: Spinach, kale, or spirulina powder.
- Orange/Yellow: Pumpkin, carrots, or turmeric powder.
- Purple: Pureed blueberries or blackberries.
li>Pink/Red: Beetroot powder or pureed berries like strawberries or raspberries.
Storage Tips
Most homemade treats lack the preservatives of store-bought versions. For crunchy, biscuit-style treats, store them in an airtight container for up to a week. For softer or meat-based treats, it’s best to keep them in the refrigerator for 3-4 days. Frozen treats, of course, stay in the freezer! If you make a big batch, most baked treats can be frozen for up to three months.
Frequently Asked Questions

Can I substitute flours in these recipes?
Yes, but with caution. Different flours have very different properties. For example, coconut flour is extremely absorbent, so you’ll need much less of it compared to whole wheat flour. If you substitute, do it in small batches and be prepared to adjust the liquid ingredients to get the right dough consistency.
How long will these homemade treats last?
It depends on the recipe. Dry, crunchy biscuits can last for about a week in an airtight container. Softer treats with meat, fruit, or yogurt should be refrigerated and consumed within 3-5 days. Frozen treats will last for a few months in the freezer. When in doubt, give it a sniff—if it smells off, toss it out.
What human Halloween candy is most toxic to dogs?
The most dangerous candies are those containing chocolate (especially dark chocolate), raisins, and anything sweetened with xylitol (often found in sugar-free gum and candy). Macadamia nuts are also toxic. It’s safest to keep all human candy far away from your dog’s reach.
Can I use regular food coloring instead of natural options?
While a tiny amount of standard food coloring is unlikely to be harmful, it’s generally best to avoid it. Many artificial dyes can cause allergic reactions or digestive upset in sensitive dogs. Using natural colorants from vegetables and fruits is a much healthier and safer way to make your treats colorful.
Conclusion
There you have it—21 ways to include your furry best friend in the Halloween festivities! Baking for your dog is more than just making a snack; it’s an act of love. You get to provide them with something delicious, control the quality of the ingredients, and have a wonderful time creating something special together.
Remember to introduce any new foods to your dog slowly and always supervise them with a new treat. Whether you made some ghoulish gummies, creepy cookies, or spooky sweets, we hope you and your pup have a safe, happy, and delicious Halloween. Happy baking!