7 Safe Homemade Beef Jerky Recipes for Dogs
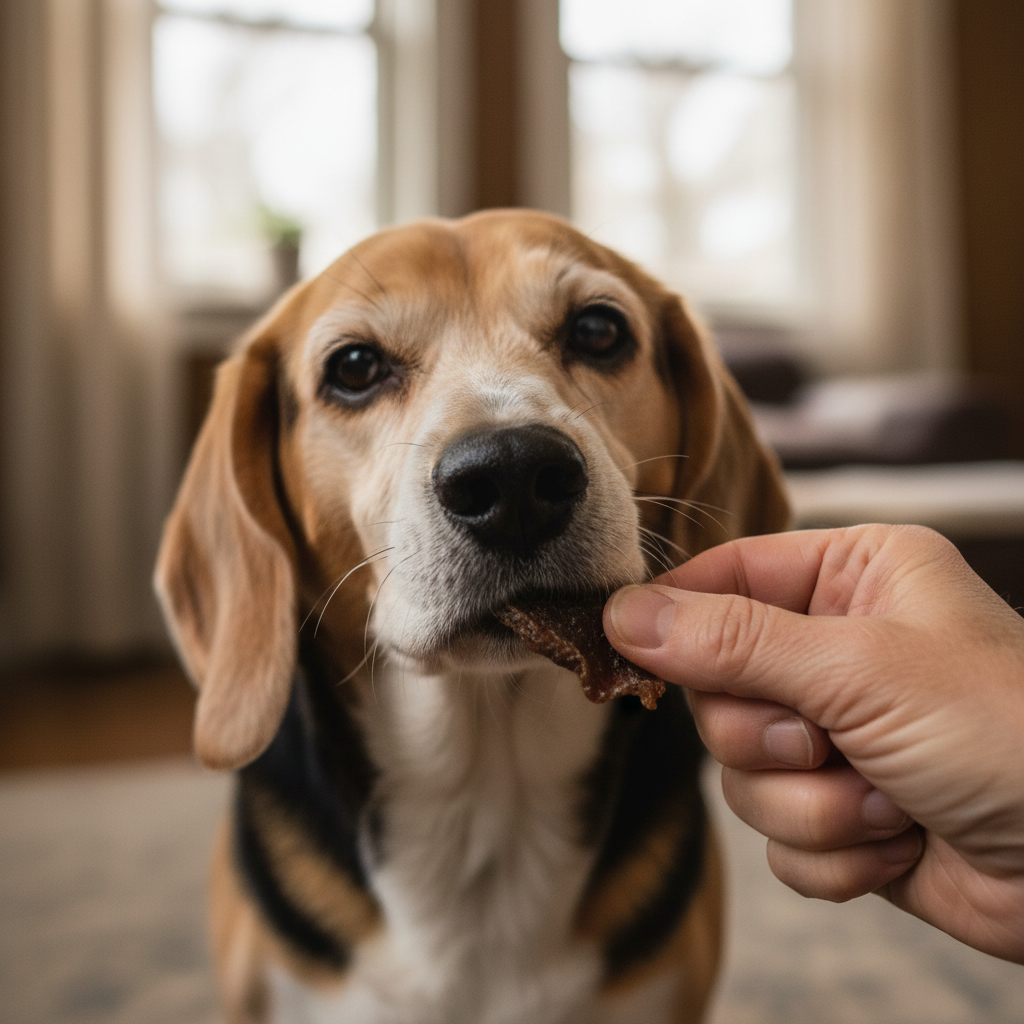
Hey there, fellow dog lovers! We all want to spoil our furry best friends, and what’s a better way to do that than with a delicious, meaty treat? But when you walk down the pet store aisle and look at the ingredients list on some of those jerky bags, it can be a little… concerning. Unfamiliar chemicals, excessive salt, and mystery preservatives? No, thank you!
What if you could give your pup the most delicious, high-value treat imaginable, knowing exactly what’s in it? Well, you can! Making beef jerky at home is not only surprisingly easy, but it’s also healthier for your dog and often more affordable. You control the ingredients, the thickness, and the chewiness, tailoring it perfectly for your pup.
Ready to become your dog’s personal chef? We’ve rounded up seven fantastic, dog-safe recipes to get you started. To help you pick the perfect one, here’s a quick look at what we’ll be cooking up:
Quick Recipe Comparison
| Recipe Name | Prep Time | Cook Time | Best For |
|---|---|---|---|
| The Classic Chewy Beef Jerky | 20 mins | 4-8 hours | Purists and beginners |
| Sweet Potato & Beef Twists | 40 mins | 5-9 hours | Adding extra vitamins and fiber |
| Rosemary Infused Jerky | 15 mins (+1 hr marinating) | 4-8 hours | A gourmet, antioxidant-rich treat |
| Low-Odor Kitchen-Friendly Jerky | 25 mins | 6-10 hours | Those with sensitive noses |
| Puppy & Senior Soft Jerky | 30 mins | 3-5 hours | Sensitive teeth and older dogs |
| Anti-Inflammatory Turmeric Jerky | 15 mins (+1 hr marinating) | 4-8 hours | Supporting joint health |
| Super-Simple Ground Beef Jerky | 15 mins | 3-6 hours | The quickest and easiest method |
1. The Classic Chewy Beef Jerky
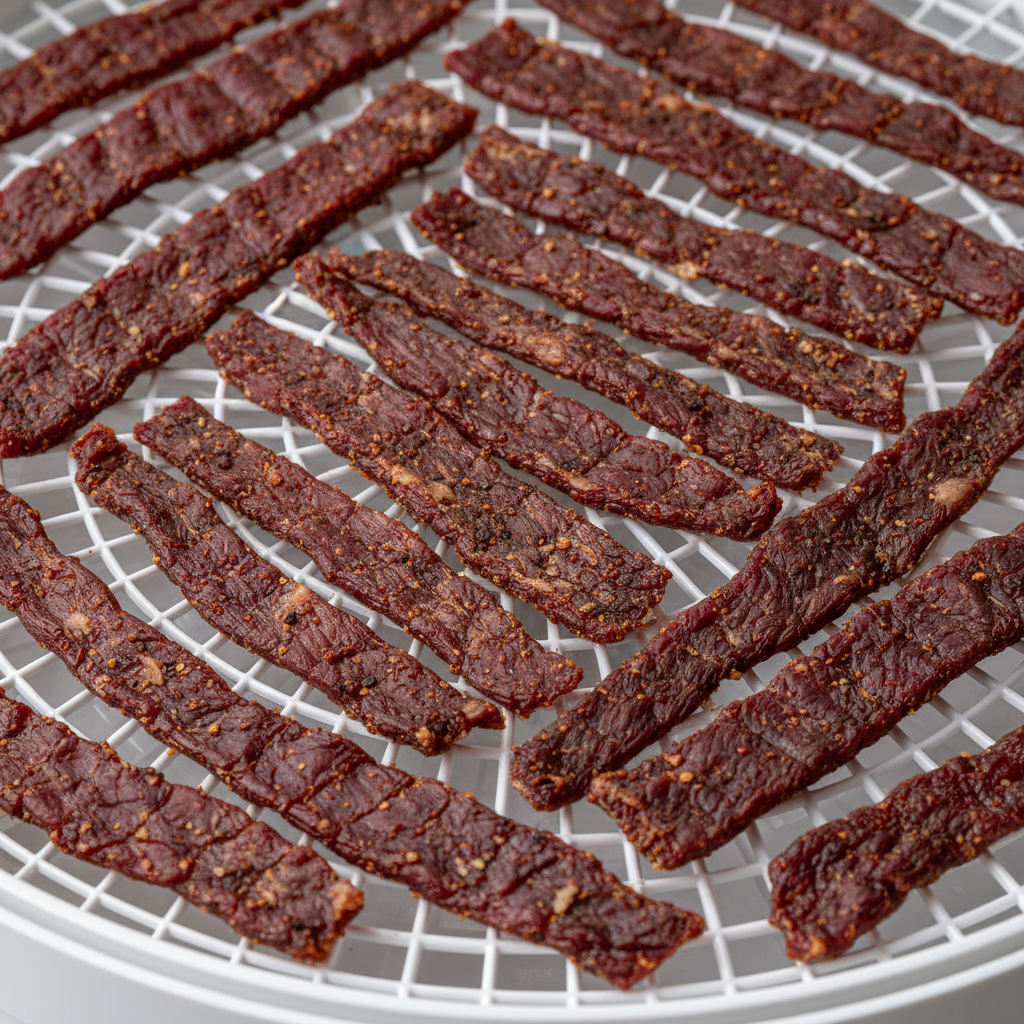
Let’s start with the basics! This is the quintessential, no-frills jerky recipe that lets the flavor of the beef shine. It’s perfect for your first time, as it requires only one ingredient and focuses on getting the technique right. The result is a tough, chewy treat that will keep your dog happily occupied.
Ingredients:
- 1-2 lbs lean beef (eye of round, flank steak, or top round are excellent choices)
Instructions:
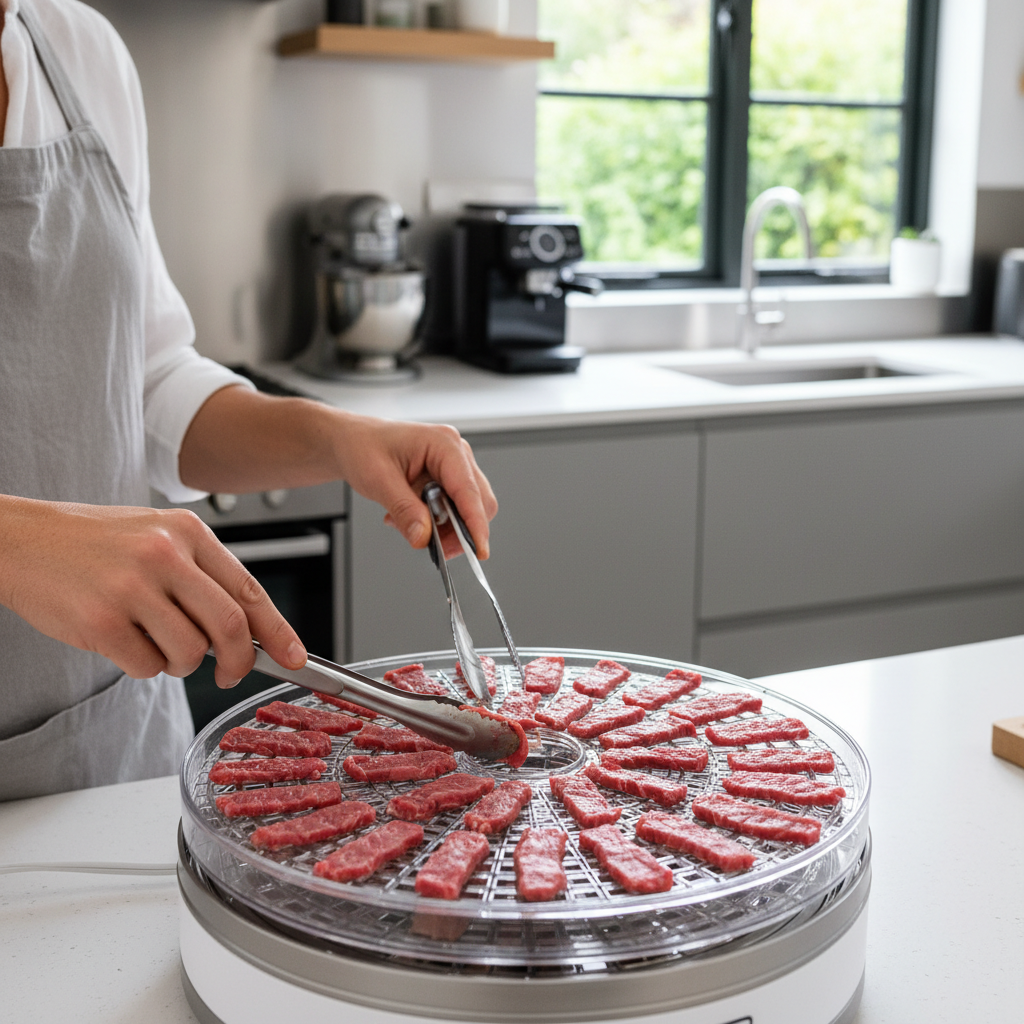
- Prep the Beef: Place the beef in the freezer for about 1-2 hours. This firms it up, making it much easier to slice thinly and evenly.
- Slice it Up: Using a very sharp knife, slice the beef into strips about 1/8 to 1/4 inch thick. For a chewier jerky, slice with the grain of the muscle. For a more tender, brittle jerky, slice against the grain.
- Arrange for Drying: Lay the beef strips in a single layer on your dehydrator trays or on wire racks placed over baking sheets (for oven drying). Make sure the pieces aren’t touching to allow for good air circulation.
- Dehydrate: If using a dehydrator, set it to 145-155°F (or the meat setting) and let it run for 4-8 hours. If using an oven, set it to the lowest possible temperature (usually 150-170°F) and prop the door open slightly with a wooden spoon to let moisture escape.
- Check for Doneness: The jerky is done when it’s dry and leathery but still flexible enough to bend without snapping. It shouldn’t be brittle. The exact time will depend on your machine and the thickness of your slices.
- Cool and Store: Let the jerky cool completely on the racks before storing. This prevents condensation from forming in the storage container.
Why We Love It
This recipe is the purest form of jerky. It’s a single-ingredient, high-protein snack that’s perfect for dogs with allergies or sensitive stomachs. You can’t go wrong with a classic!
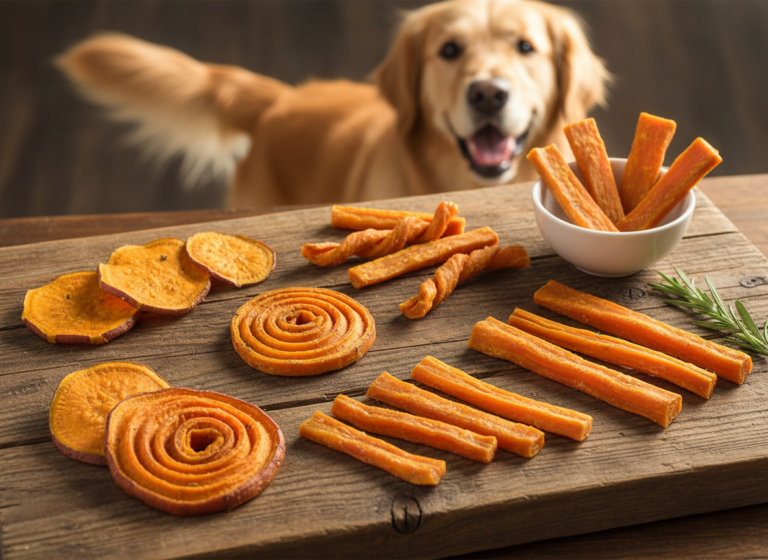
2. Sweet Potato & Beef Twists
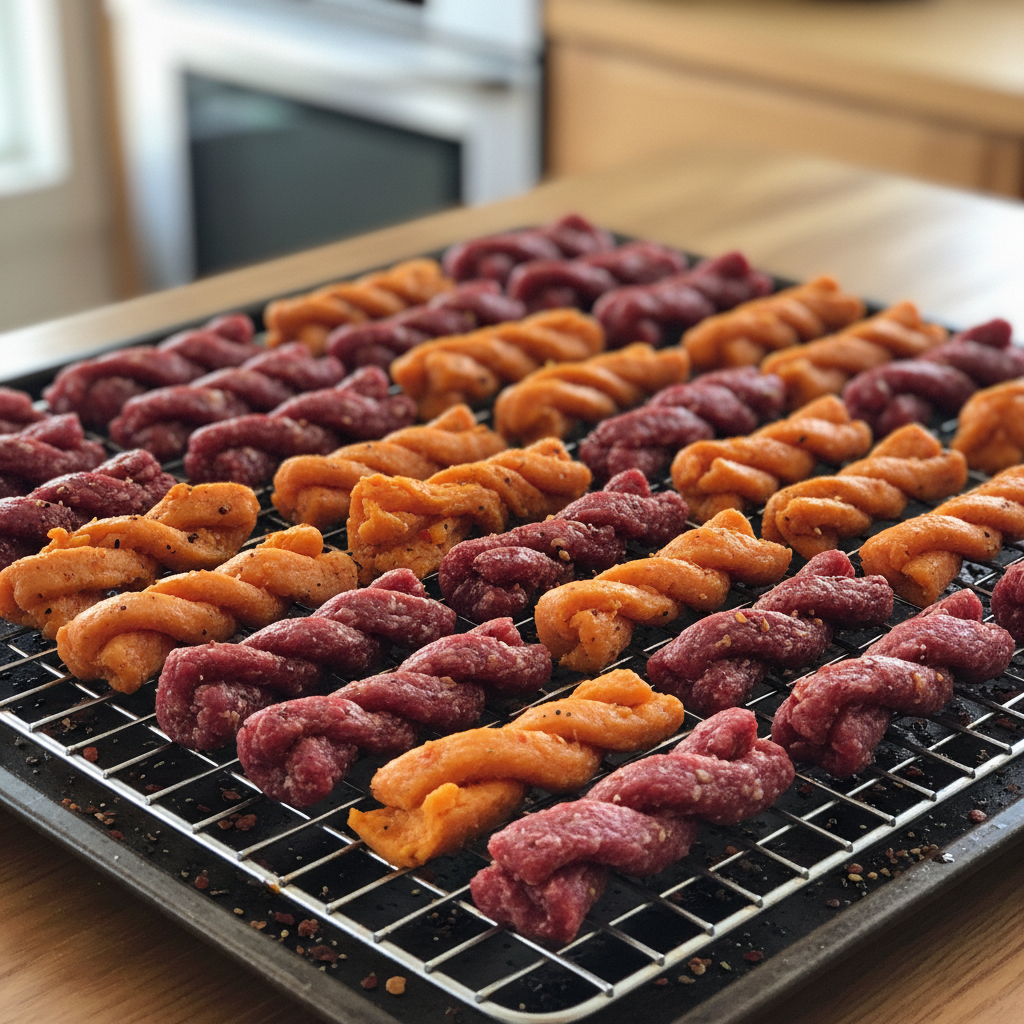
Want to sneak some extra vitamins and fiber into your dog’s treats? This recipe combines the savory flavor of beef with the natural sweetness and nutritional punch of sweet potatoes. The result is a colorful and doubly delicious jerky twist.
Ingredients:
- 1 lb lean beef, sliced into thin strips
- 1 large sweet potato
- 1 tablespoon olive oil (optional)
Instructions:
- Prepare the Sweet Potato: Peel and slice the sweet potato into long, thin planks, about 1/8 inch thick. A mandoline slicer works wonders here for consistency. Toss the slices lightly in olive oil if desired for extra healthy fats.
- Prepare the Beef: Just like the classic recipe, freeze the beef for 1-2 hours and slice it into 1/8 to 1/4 inch thick strips. Try to make them a similar length and width to your sweet potato slices.
- Assemble the Twists: Take one strip of beef and one strip of sweet potato and gently twist them together.
- Arrange and Dehydrate: Place the twists on your dehydrator trays or oven racks. They may unravel slightly, but that’s okay! Dehydrate at 145-155°F for 5-9 hours. The sweet potato will take a bit longer to dry out than the beef, so be patient.
- Check for Doneness: The beef should be leathery, and the sweet potato should be dry and slightly crispy on the edges but still a bit flexible.
- Cool Completely: Let them cool down fully before storing to ensure they stay fresh and mold-free.
Why We Love It
This is a great way to add variety and nutrients. Sweet potatoes are packed with Vitamin A, which is great for your dog’s vision, skin, and coat. Plus, they look beautiful!
3. Rosemary Infused Jerky
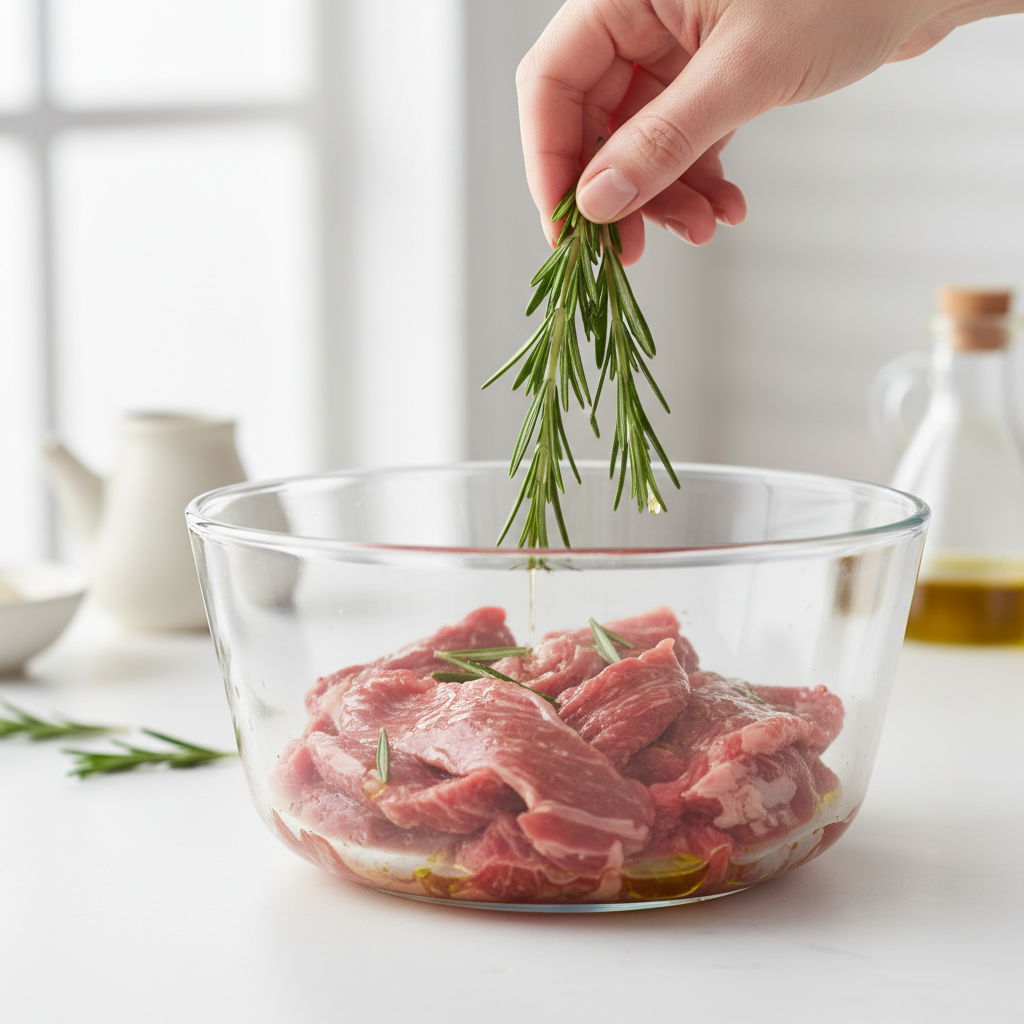
Feeling a little fancy? This recipe adds a touch of gourmet flavor with dog-safe herbs. Rosemary is a natural antioxidant and can add a wonderful aroma to the jerky. This simple marinade adds flavor without adding salt or sugar.
Ingredients:
- 1.5 lbs lean beef
- 2 tablespoons olive oil
- 1 tablespoon finely chopped fresh rosemary (or 1 teaspoon dried)
- Optional: 1 teaspoon dried parsley for fresh breath
Instructions:
- Slice the Beef: As with the other recipes, partially freeze and slice your beef into uniform strips.
- Create the Marinade: In a large bowl or zip-top bag, combine the olive oil and chopped rosemary (and parsley, if using).
- Marinate: Add the beef strips to the bowl or bag and toss thoroughly to coat every piece. Let it marinate in the refrigerator for at least 1 hour, or up to 4 hours for a stronger flavor.
- Drain and Arrange: Remove the beef from the marinade, patting off any excess oil with a paper towel. Arrange the strips in a single layer on your dehydrator or oven racks.
- Dehydrate: Dry at 145-155°F for 4-8 hours, until the jerky is dry and leathery. Your kitchen will smell amazing!
- Cool and Store: Let the jerky cool completely at room temperature before transferring to an airtight container.
Why We Love It
The subtle, herby flavor makes this treat feel extra special. It’s a fantastic way to introduce beneficial antioxidants into your dog’s diet in a way they’ll find irresistible.
4. The Low-Odor Kitchen-Friendly Jerky
Let’s be honest: dehydrating meat can sometimes make your house smell… a bit funky. This recipe is designed to minimize that lingering meaty smell while still producing a delicious treat your dog will love. The secret is a quick pre-cook and a splash of apple cider vinegar.
Ingredients:
- 1.5 lbs lean beef, sliced into strips
- 1/4 cup water
- 2 tablespoons apple cider vinegar
Instructions:
- Pre-Cook the Beef: Place the beef strips in a single layer in a large skillet. Add the water and apple cider vinegar. Bring to a simmer over medium heat and cook for 3-5 minutes, just until the beef is no longer pink. This step helps kill surface bacteria and reduces drying time and odor.
- Drain Thoroughly: Using tongs, remove the beef strips from the skillet and place them on a plate lined with paper towels. Pat them as dry as you can get them.
- Arrange for Drying: Lay the pre-cooked strips on your dehydrator trays or oven racks.
- Dehydrate: Because the meat is already partially cooked and has less moisture, the drying time will be a bit longer but at a lower temperature to prevent it from becoming too brittle. Set your dehydrator or oven to its lowest setting (around 145°F) and dry for 6-10 hours.
- Check and Cool: Check for the classic leathery texture. Let it cool completely before storing.
Why We Love It
This recipe is a lifesaver for those in smaller apartments or with sensitive noses. The apple cider vinegar is also great for a dog’s digestion and skin, adding a subtle health boost.
5. Puppy & Senior Soft Jerky
Hard, chewy jerky can be tough on the delicate teeth of puppies or the aging mouths of our beloved senior dogs. This recipe creates a softer, more pliable jerky that’s easier to chew while still providing that satisfying, meaty flavor.
Ingredients:
- 1 lb lean ground beef (93/7 or leaner)
- 1/4 cup unsweetened applesauce or pumpkin puree (acts as a binder)
Instructions:
- Mix the Ingredients: In a large bowl, use your hands to thoroughly combine the lean ground beef and the applesauce or pumpkin puree. Don’t overmix, just until it’s evenly distributed.
- Form the Strips: You have two options here. You can use a ‘jerky gun’ to extrude perfect, uniform strips directly onto your dehydrator sheets. Alternatively, you can place the meat mixture between two sheets of parchment paper and use a rolling pin to roll it out to a 1/4 inch thickness. Then, use a pizza cutter or knife to cut it into strips.
- Arrange and Dehydrate: Carefully transfer the strips to your dehydrator trays (use the solid fruit-leather sheets if you have them) or parchment-lined baking sheets for the oven.
- Dehydrate: Set the temperature to 155°F. Because this jerky is made from ground meat, it needs a slightly higher initial temperature. Dry for 3-5 hours. We’re looking for a shorter drying time to keep it soft.
- Check for Doneness: The jerky should be dry to the touch and firm, but it will still be quite flexible and soft compared to traditional jerky.
- Cool and Store: Cool completely. Due to its higher moisture content, this soft jerky should be stored in the refrigerator and used within one week.
Why We Love It
It’s inclusive! This recipe ensures dogs of all ages and dental conditions can enjoy the deliciousness of homemade jerky. The ground beef method is also super easy for beginners.
6. Anti-Inflammatory Turmeric Jerky
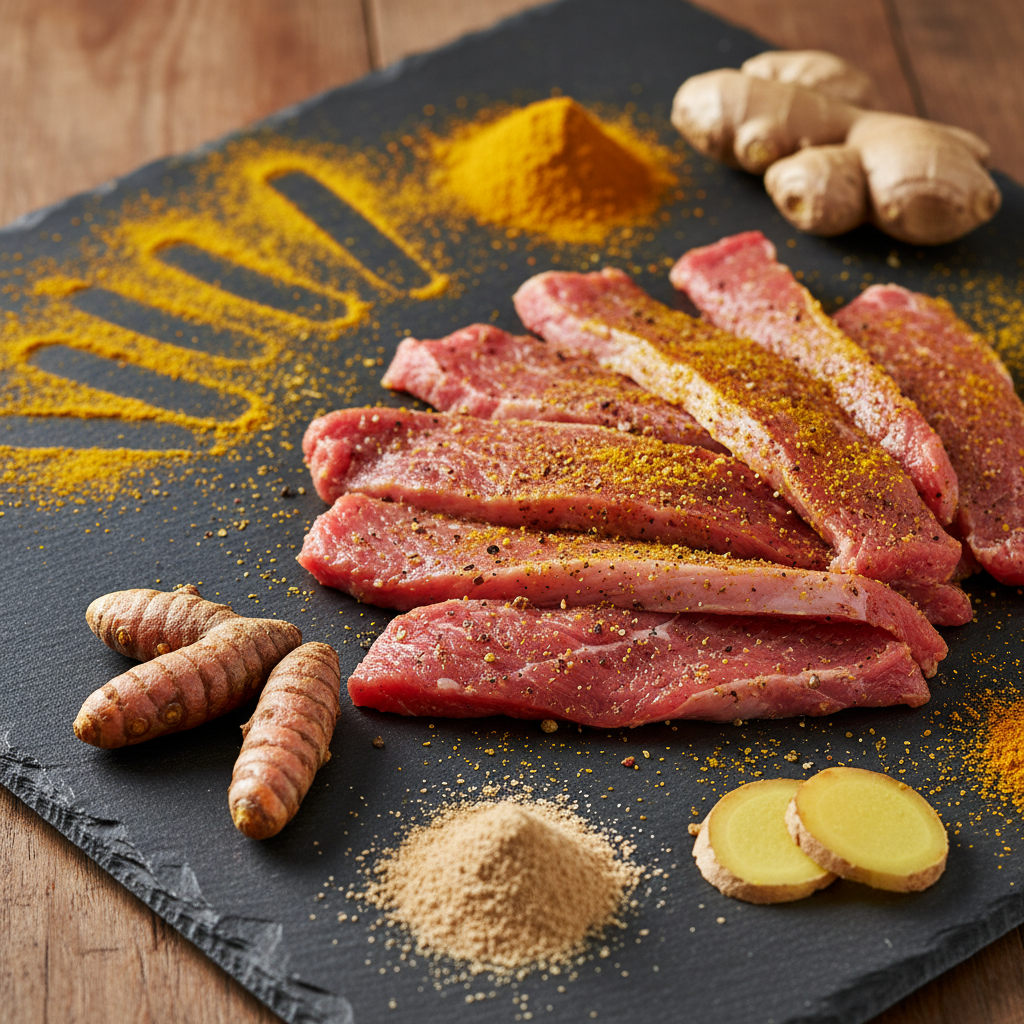
Give your dog a treat that tastes good and does good! Turmeric is a powerhouse spice known for its natural anti-inflammatory properties, making it a fantastic addition for active dogs or seniors with achy joints. This recipe creates a jerky with a beautiful golden hue and a healthful kick.
Ingredients:
- 1.5 lbs lean beef, sliced into strips
- 2 tablespoons olive oil or coconut oil, melted
- 1 teaspoon ground turmeric
- 1/2 teaspoon ground ginger (optional, also great for digestion)
- A pinch of black pepper (helps with turmeric absorption)
Instructions:
- Prepare the Marinade: In a bowl large enough to hold the beef, whisk together the oil, turmeric, ginger (if using), and black pepper to create a paste-like marinade.
- Coat the Beef: Add the sliced beef to the bowl and use your hands or a spoon to ensure every strip is evenly coated in the golden marinade. Let it sit in the fridge for at least 1 hour.
- Arrange for Drying: Place the coated beef strips in a single layer on your dehydrator or oven racks. The turmeric can stain, so be mindful of your countertops!
- Dehydrate: Dry at 145-155°F for 4-8 hours, or until the jerky is dry and leathery to your dog’s preference.
- Cool and Store: Let the jerky cool completely on the racks before storing it in an airtight container.
Why We Love It
It’s a functional treat! You’re not just giving your dog a snack; you’re providing them with ingredients that can help support their mobility and overall well-being. It’s a win-win.
7. The Super-Simple Ground Beef Jerky
Don’t have a super sharp knife or the patience to slice a whole roast? No problem! This recipe uses lean ground beef to create a tasty, slightly softer jerky that’s incredibly easy to make. It’s the perfect ‘I want to make jerky right now’ solution.
Ingredients:
- 1.5 lbs lean ground beef (at least 90% lean)
- Optional: 2 tablespoons of beef broth (no onion or garlic) to help with spreading
Instructions:
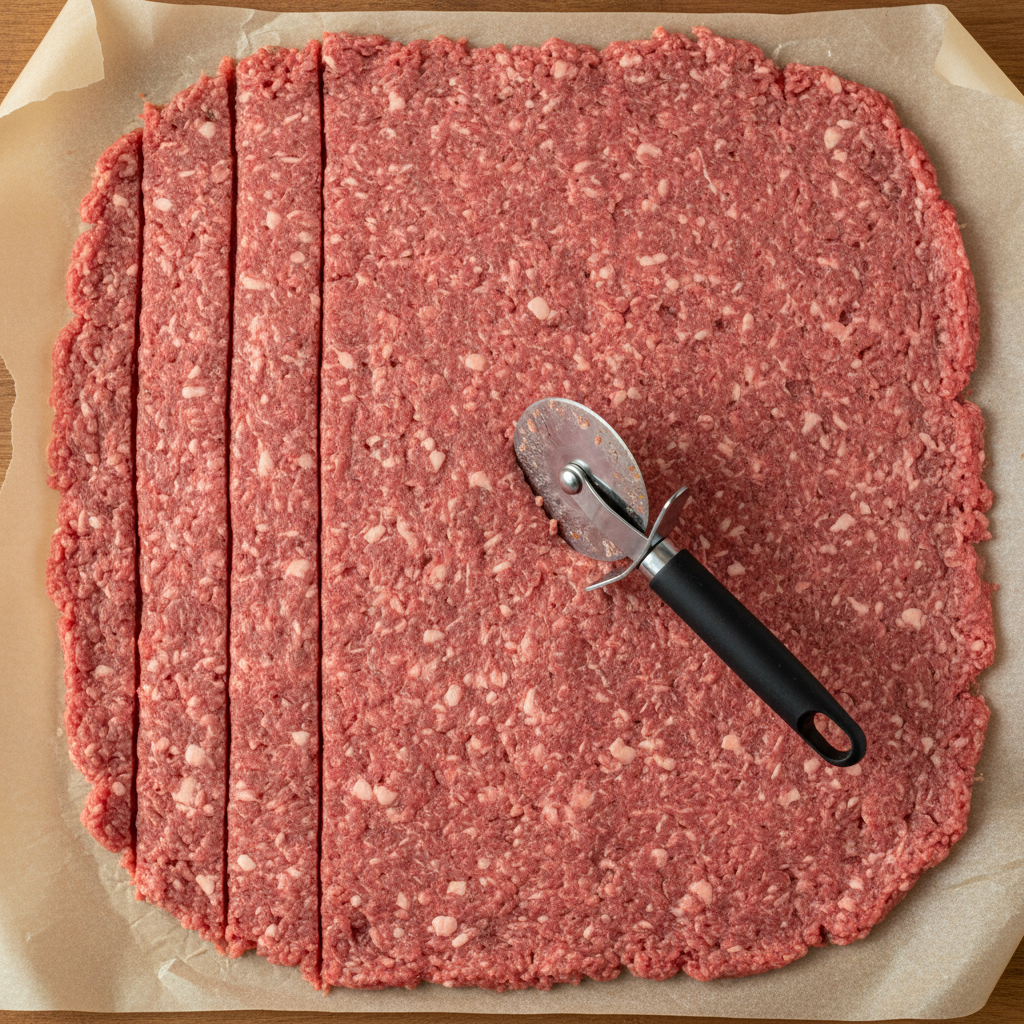
- Mix the Beef: If your ground beef feels a bit stiff, add the beef broth and mix it gently with your hands. This will make it easier to roll out.
- Roll it Out: Place the ball of ground beef between two large sheets of parchment paper. Use a rolling pin to roll the meat out into a large, thin rectangle, aiming for about 1/8 to 1/4 inch thickness. Try to keep the thickness as even as possible for uniform drying.
- Score the Meat: Remove the top layer of parchment paper. Using a pizza cutter or a knife, press down to score the meat into strips or squares. Don’t cut all the way through, just create the break-lines.
- Transfer and Dehydrate: Slide the entire sheet of parchment with the scored meat onto a baking sheet (for oven) or carefully cut it to fit your dehydrator trays. Dehydrate at 155-160°F for 3-6 hours.
- Blot and Break: About halfway through the drying time, you may notice some fat pooling on the surface. Gently blot this off with a paper towel. Once fully dried, the jerky will easily break apart along the lines you scored.
- Cool and Store: Let it cool completely before storing in the fridge. Because it’s ground meat, it’s best to store it refrigerated and use within 1-2 weeks.
Why We Love It
This is the ultimate jerky hack. It removes the most challenging step—slicing—and is virtually foolproof. It’s a fantastic way to make a big batch of treats quickly and easily.
Your Homemade Jerky Toolkit: What You Need to Know
Before you dive in, let’s talk about the key factors for jerky success. Getting these right will ensure your treats are not only delicious but also safe for your pup.
Choosing the Right Cut of Beef
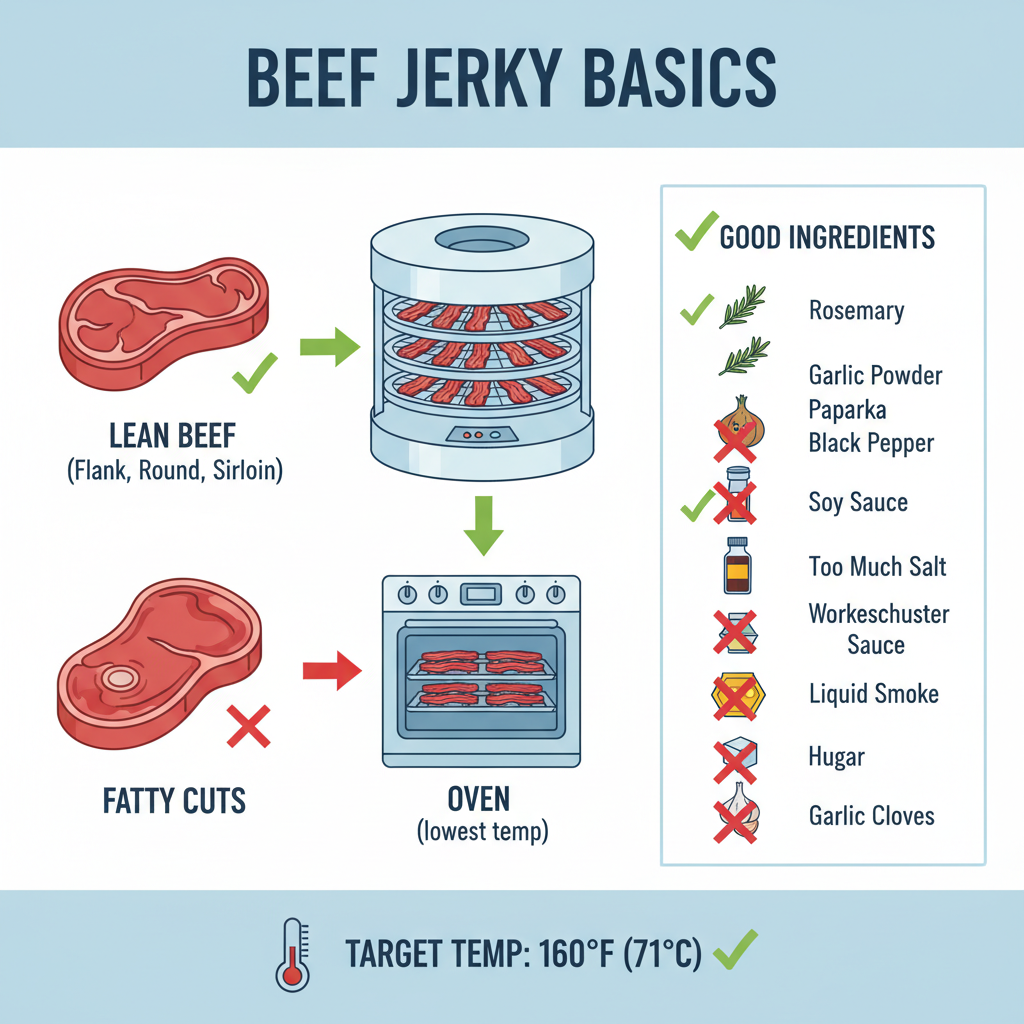
The number one rule for jerky is to go LEAN. Fat doesn’t dehydrate well and can cause the jerky to go rancid much faster. Look for cuts with very little marbling. Excellent choices include:
- Eye of Round: The gold standard for jerky. It’s very lean, affordable, and easy to slice.
- Top Round or Bottom Round: Also great, lean options.
- Flank Steak: A bit more expensive, but its long muscle fibers make for a wonderfully chewy jerky.
- Sirloin Tip: Another lean and flavorful option.
Avoid fatty cuts like ribeye or chuck roast for jerky making.
Dehydrator vs. Oven: Which is Better?
Both methods work great! A food dehydrator is designed for this and provides excellent, consistent air circulation at low temperatures. An oven can also work perfectly well; you just have to set it to its lowest temperature (under 180°F) and prop the door open with a wooden spoon to allow moisture to escape. A dehydrator is a ‘set it and forget it’ tool, while the oven method requires a little more monitoring.
Ingredients to ALWAYS Avoid
While we love adding fun, healthy flavors, some human foods are toxic to dogs. When making jerky, NEVER use:
- Onion or Onion Powder
- Garlic or Garlic Powder
- Excessive Salt
- Xylitol (an artificial sweetener)
- Spicy seasonings like cayenne pepper
Stick to the simple, dog-safe ingredients in these recipes for a happy and healthy pup.
Proper Storage for Maximum Freshness
Once your jerky is completely cool (this is crucial!), store it in an airtight container. A glass jar, zip-top bag, or vacuum-sealed bag works well. For standard, hard jerky, it can be stored in a cool, dark place for 2-4 weeks. For softer jerky or jerky made with ground beef, it’s safest to store it in the refrigerator and use it within 1-2 weeks.
Frequently Asked Questions

- 1. How long does homemade beef jerky for dogs last?
- Properly dehydrated and cooled jerky made from solid muscle cuts will last for about a month in an airtight container in a cool, dark pantry. Softer jerky or jerky made from ground meat has a higher moisture content and should be stored in the refrigerator and consumed within 1-2 weeks.
- 2. Can I use other meats besides beef?
- Absolutely! You can use these same techniques with other lean meats. Chicken breast, turkey breast, and lean cuts of pork or venison all make fantastic jerky for dogs. Just be sure to slice them thinly and dehydrate them thoroughly.
- 3. My jerky turned out brittle and snaps instead of bends. What went wrong?
- This usually means it was either sliced too thin or, more commonly, it was dehydrated for too long. Over-dried jerky becomes crumbly. Next time, start checking on it an hour or two earlier than the recipe suggests. Every oven and dehydrator is different, so it takes a little practice to find the perfect timing for your setup.
- 4. Is it really cheaper to make my own dog jerky?
- It certainly can be! A single bag of high-quality, single-ingredient beef jerky from a boutique pet store can be quite expensive. By buying a lean roast on sale, you can often make two to three times the amount of jerky for the same price. You’re paying for the fresh meat, not the processing, packaging, and marketing.
Conclusion
There you have it! Seven simple, safe, and mouth-watering ways to show your dog some love. Making your own treats is a rewarding experience that gives you complete peace of mind about what your furry friend is eating. It’s a fun weekend project that will fill your home with a delicious aroma (especially with the low-odor recipe!) and your dog’s heart with joy. So pick a recipe, preheat that oven or dehydrator, and get ready to earn the ‘Best Dog Parent Ever’ award. Happy cooking!