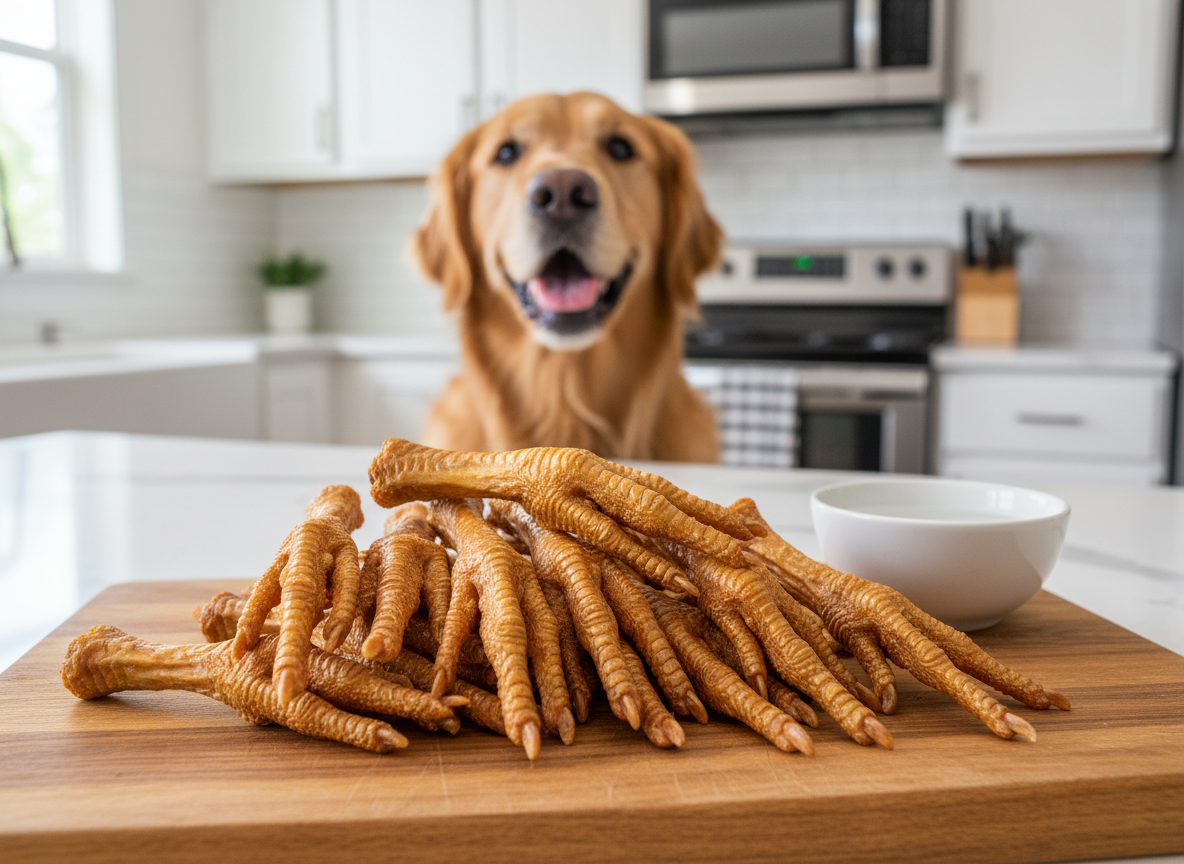
7 Steps to DIY Dehydrated Chicken Feet for Dogs
Hey there, fellow dog lovers! Are you tired of wandering down the pet store aisle, staring at a wall of expensive, mysterious dog chews with ingredients you can’t even pronounce? We’ve all been there. We want the best for our furry family members, but it shouldn’t have to break the bank or require a chemistry degree to understand the label.
What if I told you there’s a super healthy, all-natural, and incredibly affordable treat that your dog will go absolutely bonkers for? And the best part? You can make it right in your own kitchen. Say hello to dehydrated chicken feet!
Now, I know what you might be thinking. Chicken feet? It sounds a little… rustic. But trust me, to your dog, these are crunchy, delicious, golden sticks of pure joy. They are packed with naturally occurring glucosamine and chondroitin, which are absolute powerhouses for supporting healthy joints and mobility. Forget expensive supplements; this is the real deal, straight from nature.
Making them yourself is not only cost-effective but also gives you complete control over the quality. No additives, no preservatives, no mystery ingredients—just 100% chicken. In this guide, we’re going to walk you through seven simple steps to turn those humble chicken feet into a premium treat your pup deserves. Let’s get cooking!
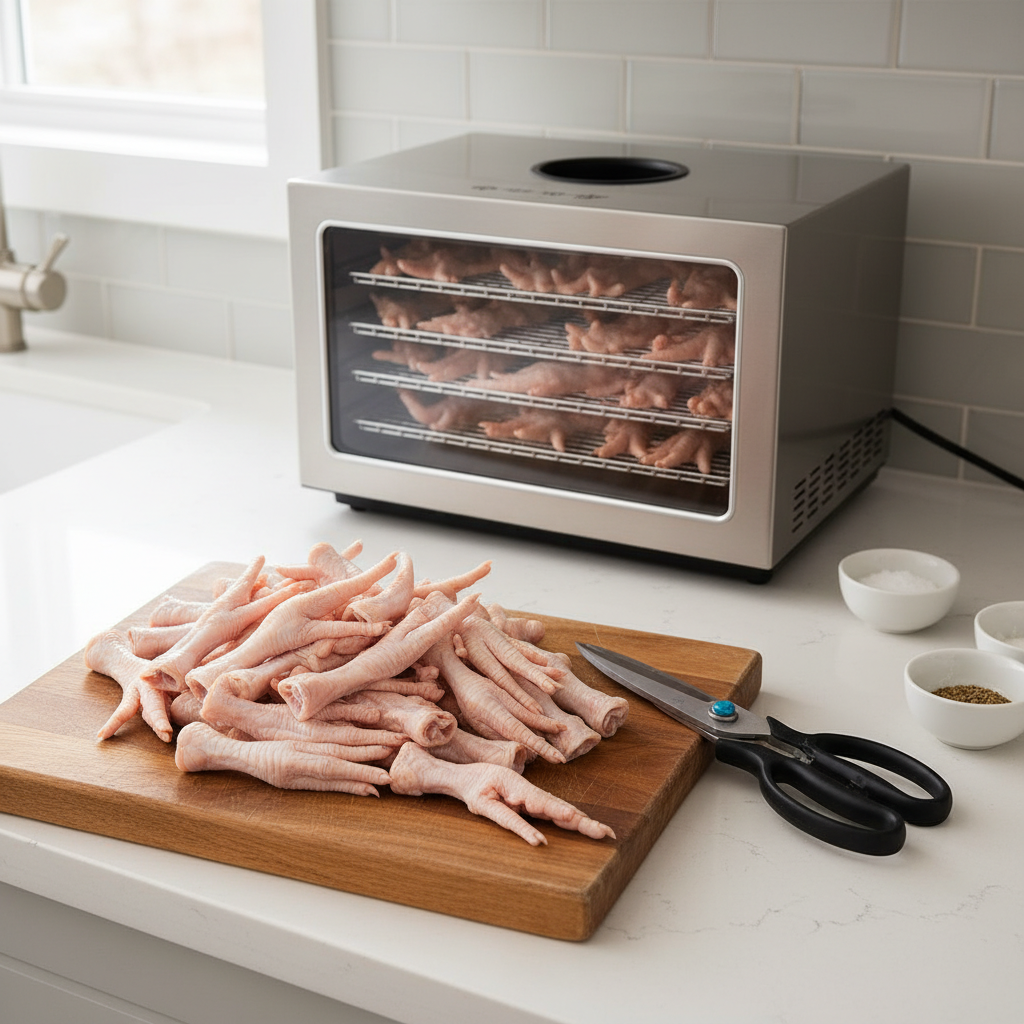
What You’ll Need
- Raw Chicken Feet (as many as you’d like to make)
- Poultry Shears or a heavy-duty knife
- A large cutting board
- A large bowl
- Apple Cider Vinegar (optional, but recommended)
- Paper Towels
- A Food Dehydrator or an Oven
Step 1: Gather Your Supplies & Choose Your Chicken Feet
Alright, let’s get our chef hats on! The first step is always getting your workstation ready. Before you even touch a chicken foot, make sure you have everything from the list above within arm’s reach. This will make the whole process smooth and efficient. You’ll want a clean, dedicated space, preferably one that’s easy to wipe down afterward.
Now for the star of the show: the chicken feet. The quality of your final product starts right here. While you can sometimes find them at your regular grocery store, your best bet is often a local butcher, an Asian market, or a nearby farm. These sources often have fresher, higher-quality products. Look for feet that are plump, pale, and clean-looking. Avoid any that look discolored, have a strong odor, or seem slimy. Fresh is best! If you buy them frozen, make sure to thaw them completely in the refrigerator before you begin.
Don’t be shy about buying in bulk if you find a good source. These treats store wonderfully in the freezer once they’re dehydrated, so you can make a big batch that will last for months.
Step 2: The All-Important Prep Work – Cleaning & Trimming
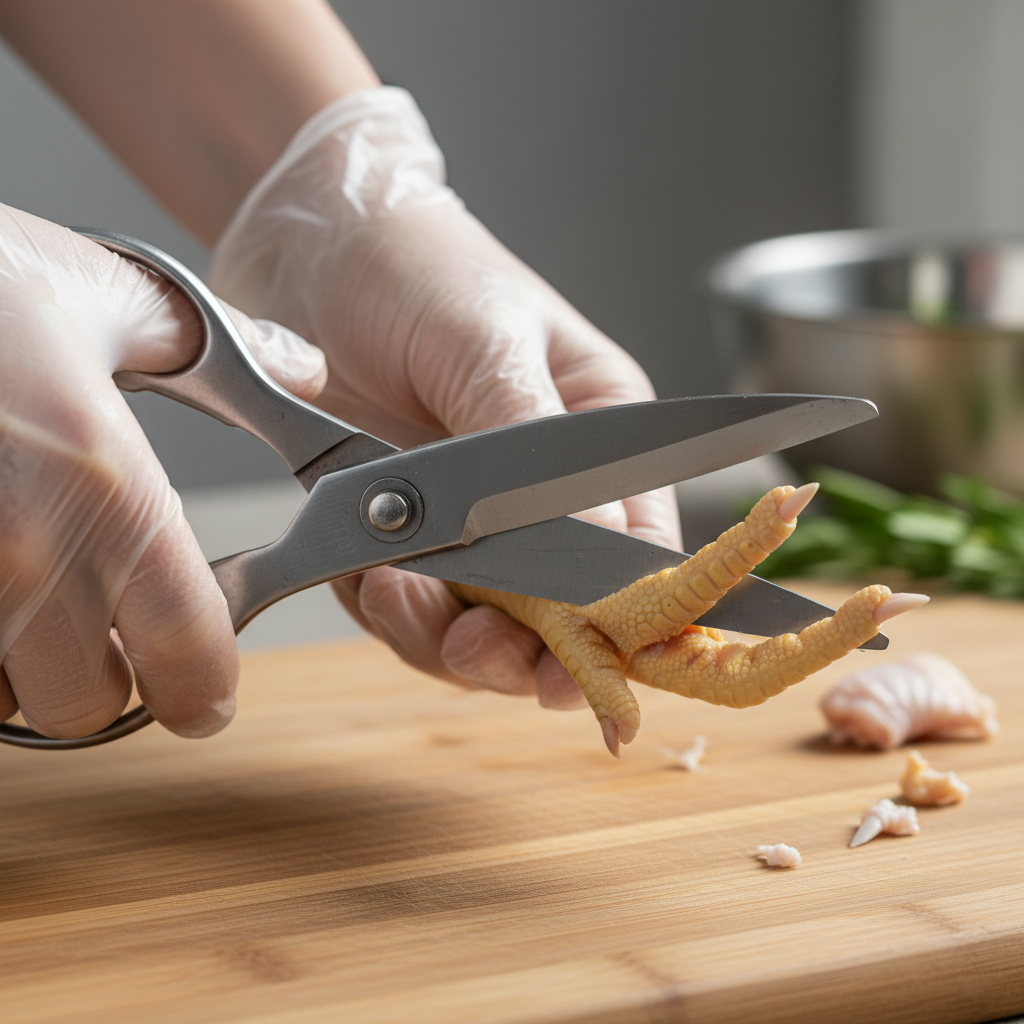
Okay, this is probably the least glamorous part of the process, but it’s super important for making a safe and high-quality treat. Give the chicken feet a thorough rinse under cold running water. You want to wash away any dirt or residue that might be on them. Some people like to use a vegetable brush to give them a gentle scrub.
Once they’re clean, it’s time for a little pedicure. The main task here is to trim the sharp talons or claws off the end of each toe. Why? Because these can be sharp and could potentially poke or scratch your dog’s mouth or digestive tract. While the risk is low, it’s a simple safety measure that’s well worth the effort.
To do this, place a foot flat on your cutting board and use a sharp pair of poultry shears to snip off the very tip of each nail. A heavy, sharp knife (like a cleaver) also works—just be extra careful with your fingers! You just need to remove the sharp, pointy end. Some feet may also have a thin, yellow outer membrane on the skin. If you can, peel this off. Sometimes it comes off easily after a quick blanch in hot water, but for dehydrating, it’s often not necessary as the process takes care of it. The key is clean feet and trimmed nails.
Step 3: The Optional (But Recommended!) Vinegar Soak
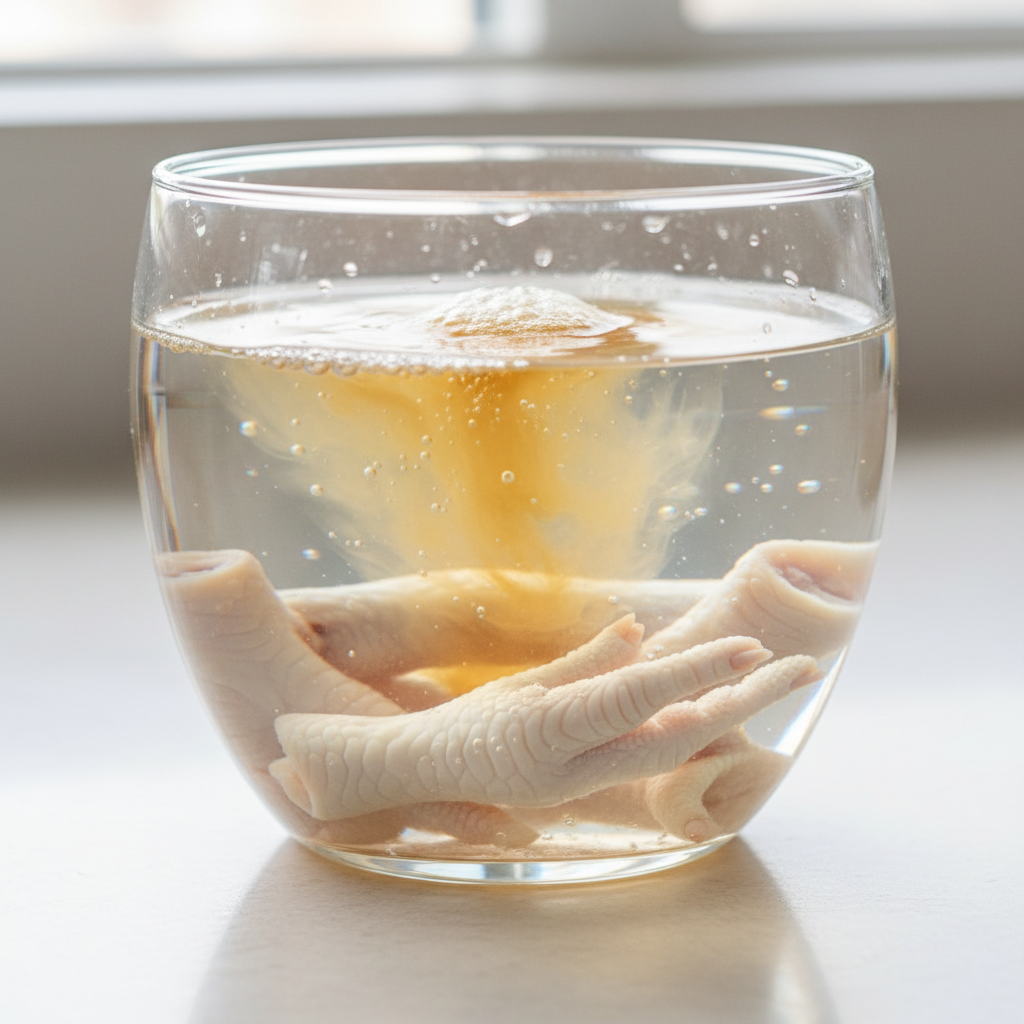
Want to take an extra step to ensure your homemade treats are as safe as possible? Give them a quick soak in a vinegar solution. This isn’t strictly necessary, but it’s a fantastic way to help sanitize the feet and inhibit any surface bacteria. It’s a simple trick that provides a lot of peace of mind.
In your large bowl, create a simple solution of one part apple cider vinegar (or white vinegar) to about three parts water. You don’t need to be super precise with the measurements. Just make sure you have enough liquid to fully submerge all the chicken feet.
Plop your cleaned and trimmed feet into the bowl and let them soak for about 15 to 20 minutes. Swish them around a bit to make sure they all get coated. The vinegar works as a natural disinfectant. Don’t worry, the taste and smell won’t linger after the long dehydration process, so your pup won’t even notice!
Step 4: Pat Them Dry for Perfect Crisping
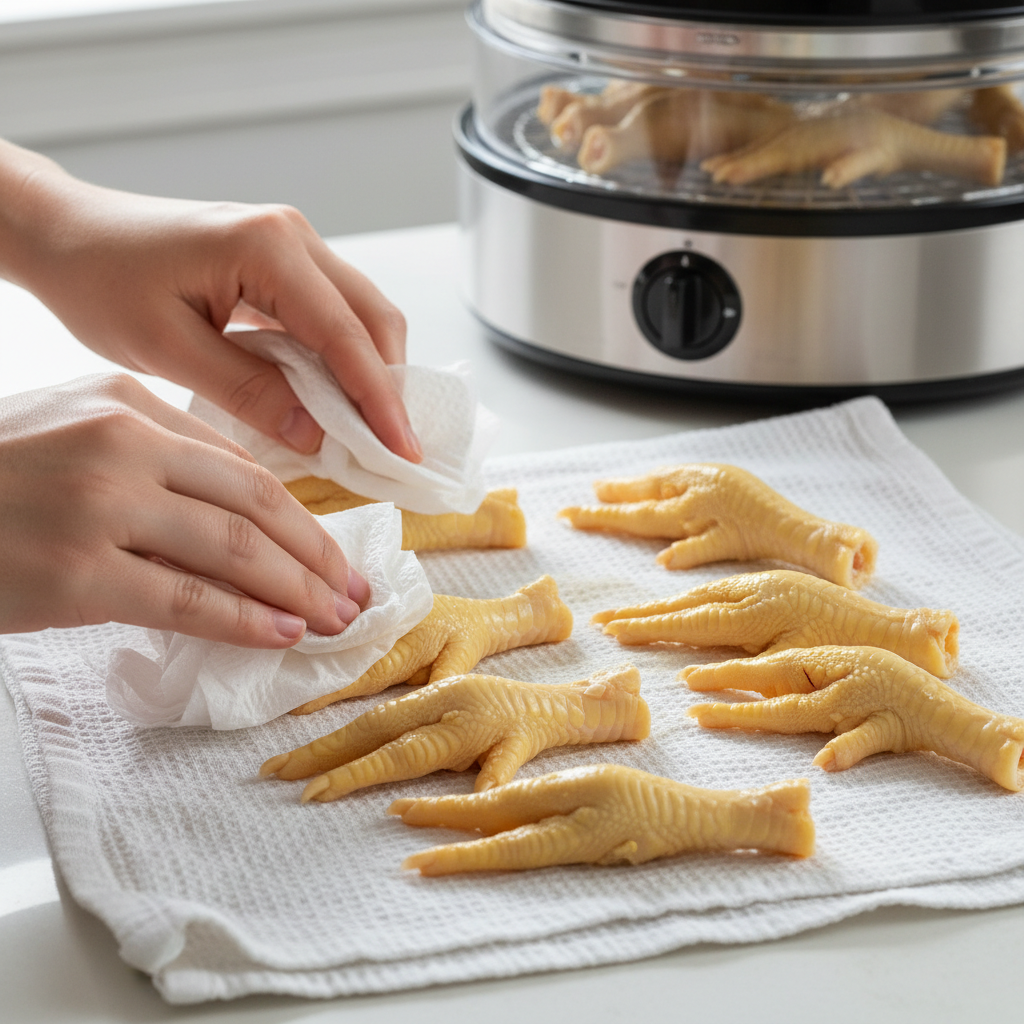
This step might seem minor, but it’s the secret to achieving that perfectly crispy, crunchy texture your dog will love. The goal of dehydrating is to remove moisture, and any excess water on the surface will just turn to steam, slowing down the process and potentially leading to a chewier, less-preserved treat.
After their vinegar bath, drain the chicken feet well in a colander. Then, lay them out on a layer of paper towels. Use more paper towels to pat each foot down, absorbing as much surface moisture as you possibly can. Get into all the nooks and crannies. The drier they are going into the dehydrator or oven, the more efficiently they will dry out. This simple action can easily shave a few hours off your total dehydration time and result in a far superior final product.
Step 5: Arrange for Success on Your Dehydrator Trays or Baking Sheets
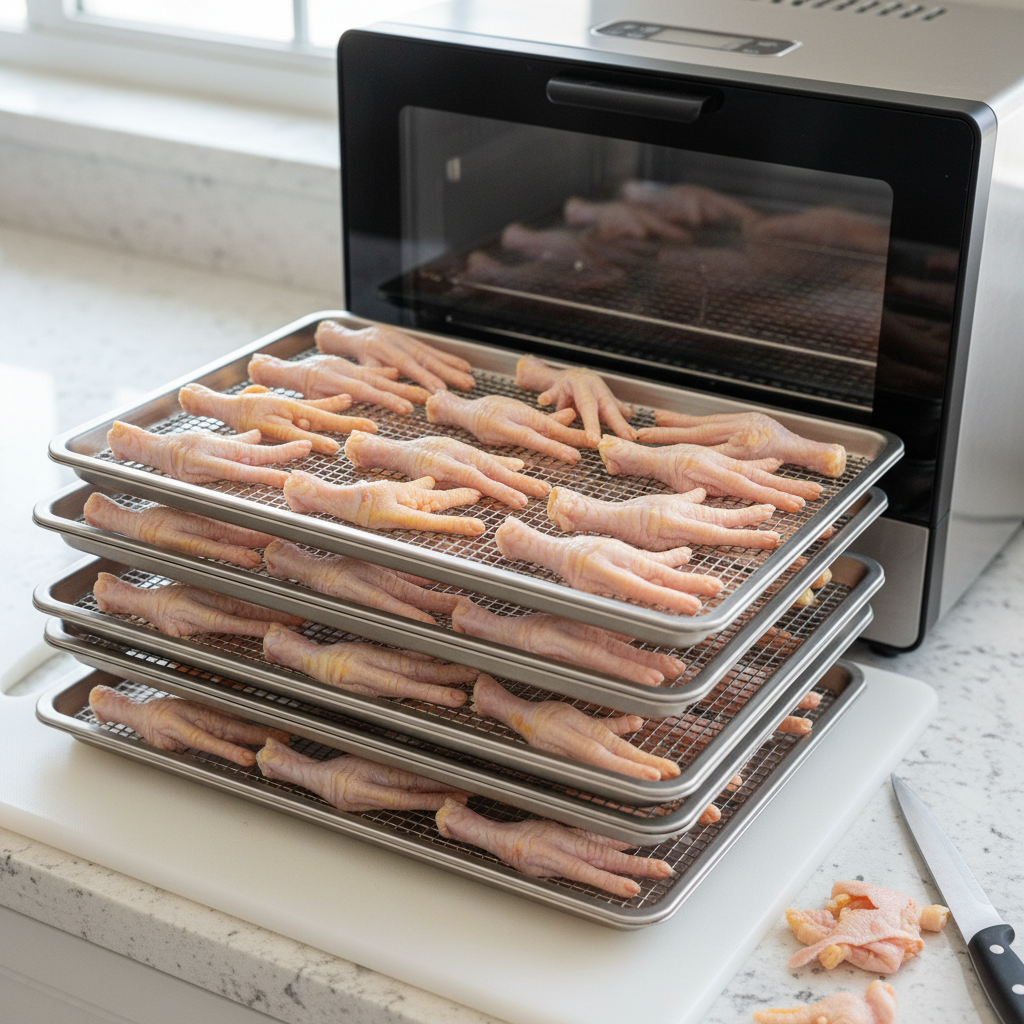
Proper arrangement is key for even drying. Whether you’re using a fancy food dehydrator or your trusty oven, the principle is the same: maximize air circulation.
For Dehydrator Users: Place the chicken feet directly onto the dehydrator trays. Arrange them in a single layer, making sure that none of them are touching. You want to leave a little bit of space—even just a centimeter—around each foot. This allows the warm air to circulate freely all around each piece, ensuring they all dry at the same rate. Don’t be tempted to overcrowd the trays! It’s better to do two smaller batches than one overcrowded one.
For Oven Users: You can’t just place the feet on a solid baking sheet, as the bottoms won’t get any air and will end up greasy and steamed. The solution is to place a wire cooling rack (the kind you use for cookies) inside a rimmed baking sheet. Arrange the chicken feet on top of the wire rack, again in a single layer with space between them. This elevates the feet and allows the air in your oven to move all around them, mimicking the function of a dehydrator.
Step 6: The Low and Slow Dehydration Process

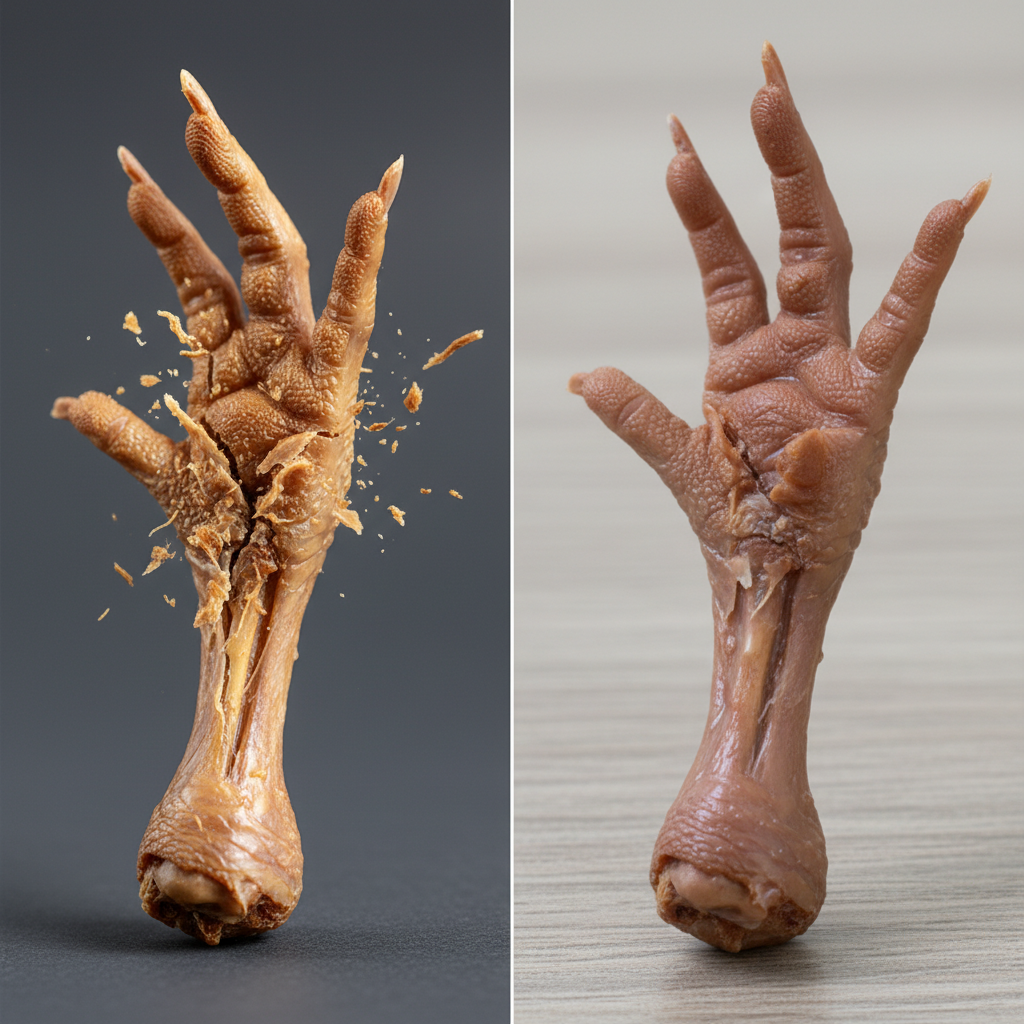
Patience is a virtue, especially when it comes to dehydration. This is not a fast process, but the hands-off waiting time is well worth it. The ‘low and slow’ method is crucial for safely removing moisture without actually cooking the bones, which is what keeps them from splintering.
In a Dehydrator: This is the easiest and most energy-efficient method. Set your dehydrator to a temperature between 155-165°F (around 70-75°C). This is high enough to keep bacteria at bay but low enough to not cook the feet. Now, let it run for at least 24 hours. Depending on the size of the feet and the humidity in your home, it could take up to 48 hours or even a little longer.
In an Oven: Set your oven to its lowest possible temperature setting, ideally below 170°F (77°C). If your oven runs hotter, you may need to prop the door open just a crack with the handle of a wooden spoon to allow heat and moisture to escape. Place the baking sheet with the wire rack inside. The drying time will be similar to a dehydrator, around 24-36 hours.
How to Tell When They’re Done: A finished chicken foot will be very hard, lightweight, and shrunken. It should look dry and golden-brown, not greasy. The ultimate test is to take one out (let it cool first!) and try to bend it. It shouldn’t have any give. It should snap cleanly, like a twig. If it bends or feels leathery, they need more time. It’s always better to over-dry than under-dry, as any remaining moisture can lead to mold.
Step 7: Cooling, Storing, and Finally… Treating Your Pup!
You’ve made it! The house smells… interesting, and you have a beautiful batch of golden, crunchy dog treats. The final step is just as important as the rest. Before you even think about storage, you must let the chicken feet cool down completely to room temperature. Spreading them out on a wire rack for a few hours is perfect. If you store them while they’re still warm, condensation will form inside the container, reintroducing the moisture you just spent 24+ hours removing and leading to spoilage.
Once they are 100% cool and dry, it’s time to store them. For short-term storage (up to 2-3 weeks), an airtight container like a glass jar or a zip-top bag in the refrigerator is perfect. For long-term storage, the freezer is your best friend. They’ll last for 6 months or more in the freezer, and your pup will love them just as much straight from the cold—it’s an extra-crunchy, soothing treat for their gums!
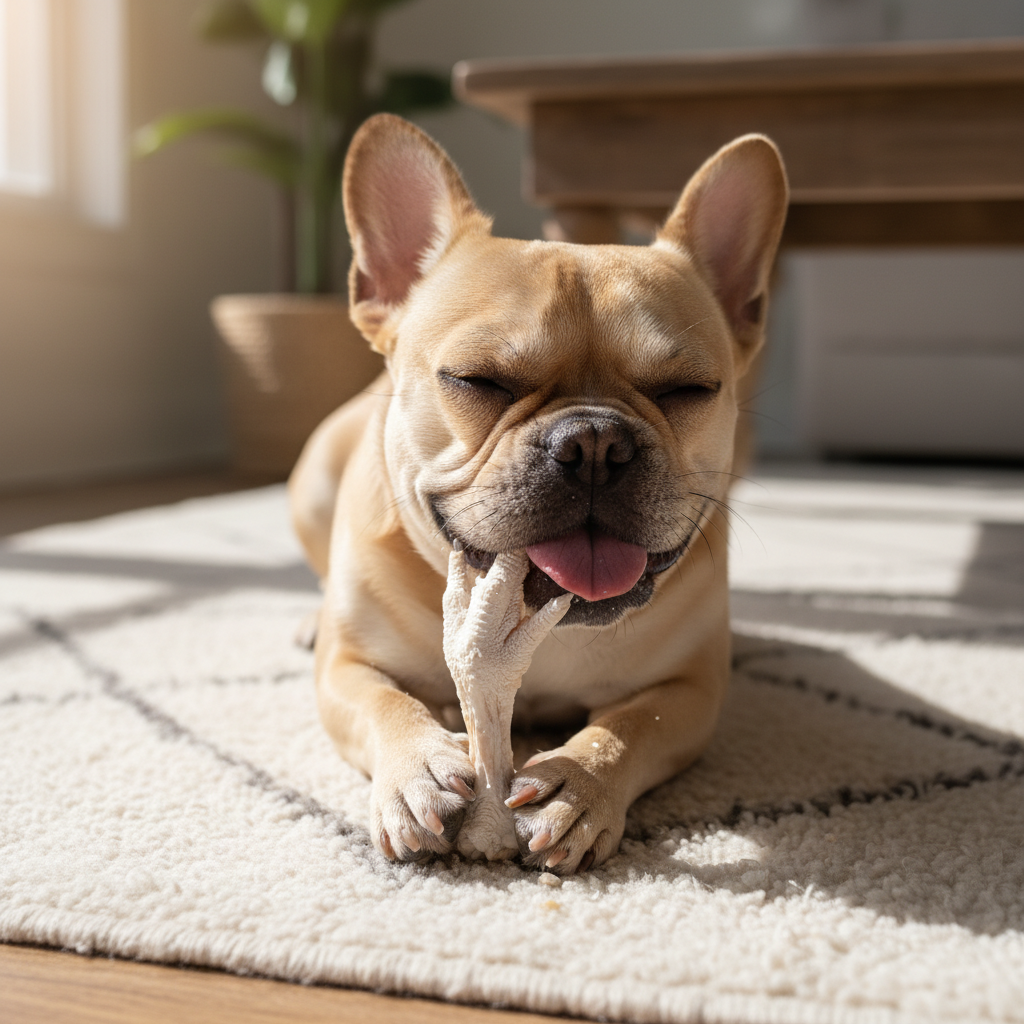
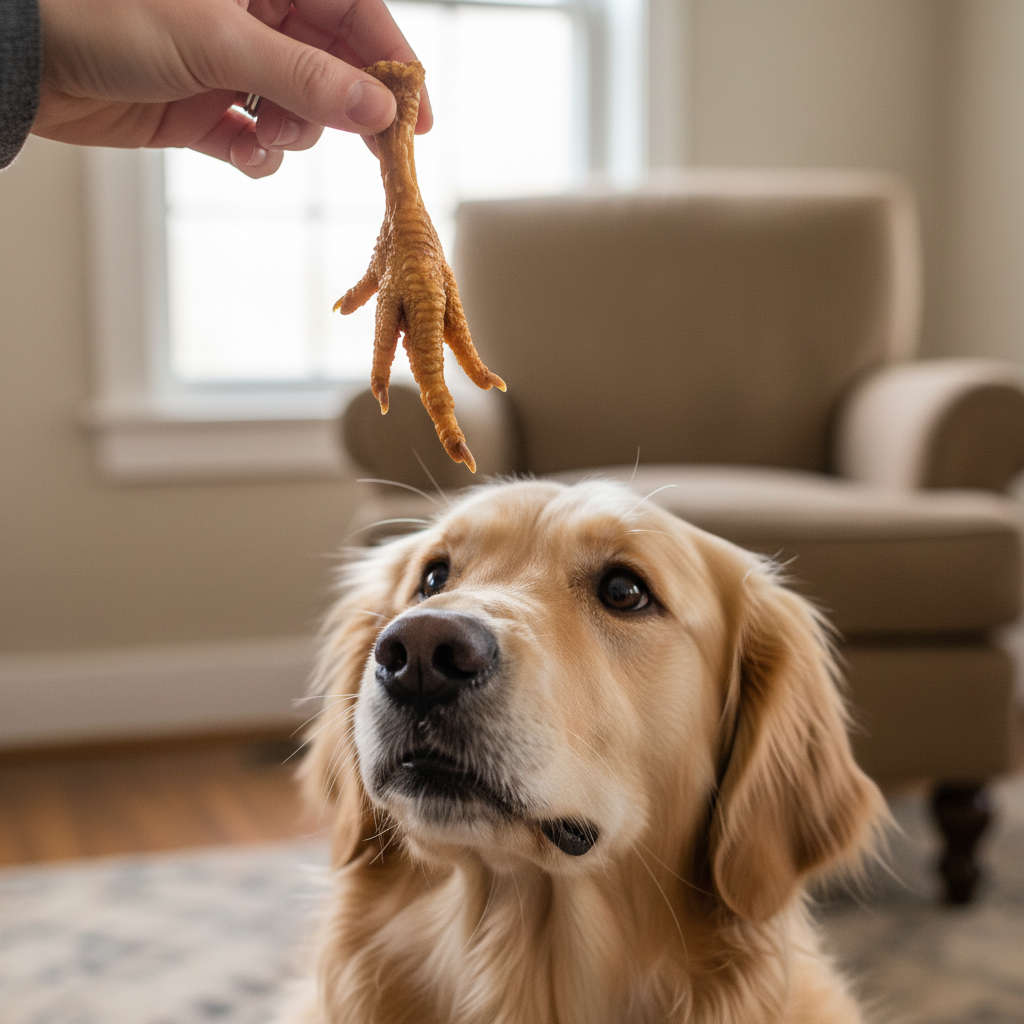
Now for the best part: the taste test! Call your furry supervisor over and reward them for their patience. Start by giving them just one. As with any new treat, it’s important to supervise your dog while they’re chewing to make sure they handle it well. Watch them crunch, munch, and enjoy the delicious, healthy treat you made with love. You’ve officially earned the ‘Best Dog Parent Ever’ award!
Your Guide to Perfect & Safe DIY Chicken Feet
Making your own treats is incredibly rewarding, but it’s natural to have questions about safety and best practices. Think of this as your go-to guide for getting it right every time.
Sourcing Your Feet
We touched on this earlier, but it’s worth repeating: quality matters. Aim for chicken feet from birds raised without antibiotics if possible. A good relationship with a local butcher can be invaluable. They can tell you about their sourcing and may even set aside feet for you regularly.
The Raw vs. Cooked Bone Debate
This is the most critical safety point. We are all taught to never give dogs cooked chicken bones. This is 100% true! Cooked bones become brittle and can splinter into sharp shards, posing a serious risk. However, the dehydration process is different. Because it uses low heat over a long period, it removes moisture without ‘cooking’ the bone in the traditional sense. The resulting bones are hard and brittle, but they crush and crumble into a powder when chewed, rather than splintering. This makes them safe for dogs to consume. You are essentially preserving them, not cooking them.
Supervision is Non-Negotiable
Even with the safest chews, supervision is key. Always watch your dog when you give them a new treat, including dehydrated chicken feet. This ensures they are chewing properly and not trying to gulp large pieces down. Every dog has a different chewing style, so it’s important to know yours.
Troubleshooting Common Issues
- My feet are still bendy/leathery: They’re not done yet! Put them back in the dehydrator. They need to be completely hard and snap easily.
- They seem greasy: This can happen if the oven temperature was a bit too high, rendering some of the fat. They are likely still fine, but pat them with a paper towel and be sure to store them in the fridge or freezer.
- I see mold!: This means they were not dried completely and moisture was left behind. Unfortunately, the entire batch should be discarded to be safe. Next time, increase your drying time.
Frequently Asked Questions About DIY Chicken Feet
Are dehydrated chicken feet really safe for dogs?
Yes, when prepared correctly. Unlike cooked bones that splinter, properly dehydrated bones are brittle and crush when chewed. They are a fantastic source of glucosamine, chondroitin, and collagen, which are all wonderful for a dog’s joint, skin, and coat health. The key is the low-and-slow dehydration process.
How many chicken feet can I give my dog?
This depends on the size of your dog and their digestive system. For a small dog, one foot every other day might be plenty. For a large dog, one per day is generally fine. Think of them as a special chew or a high-value treat, not a meal replacement. When first introducing them, start with just one and see how your dog’s stomach handles it before making it a regular thing.
Can I make these in my air fryer?
While an air fryer is a great appliance, it’s generally not recommended for this specific project. Most air fryers have a minimum temperature that is too high for true dehydration and their primary function is to cook and crisp food quickly with circulating hot air. This would cook the bones, making them unsafe and splintery, rather than dehydrating them safely.
Okay, but they look pretty gross. Will my dog actually eat them?
We get it, they aren’t the most appetizing-looking things to us humans! But what we see as strange, dogs see (and smell) as a delicious, high-value, crunchy treat. Dogs are naturally drawn to these kinds of textures and flavors. Give it a try—you’ll likely be surprised at how quickly your pup becomes a card-carrying member of the chicken feet fan club!
Conclusion
And there you have it! Seven straightforward steps to becoming a master chef in your dog’s eyes. By making your own dehydrated chicken feet, you’re not just saving money; you’re providing your best friend with a clean, healthy, and incredibly beneficial treat. You have total control over the ingredients (all one of them!) and the satisfaction of knowing exactly what your dog is consuming.
It’s a simple project that mostly involves a lot of waiting, but the result is a happy, crunching pup and a stash of premium treats that will last for weeks or months. So, next time you’re at the butcher or a local market, don’t shy away from that pile of chicken feet. See them for what they are: a fantastic opportunity to spoil your dog in the healthiest way possible. Happy dehydrating!